
Today I share with you another tutorial as part of my Sizzix Design Team series using their 1.5″ Bigz Alphabet Die Set. This project also is the first in my new “Jessee’s Playlist” series, where I create a project using either lyrics or images pertaining to songs in my playlist. I thought it would be neat to combine my two greatest loves, creating and music!
This project could easily be modified to use the type of products you prefer, I just have my preferences. I’ll point out where things can be changed around throughout the tutorial.
The first thing I did was pick out my quote. I spent hours just listening to music until I found one that fit. It was really hard work! Haha.
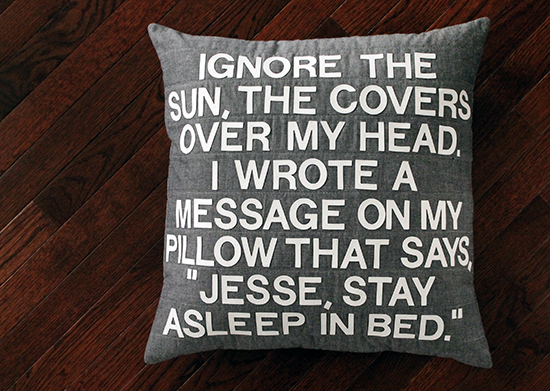
I chose an excerpt from a Brand New song titled Seventy Times 7. This song has been in almost every playlist I have put together for the past 14 years. 14 YEARS! It probably helps that I’ve seen the band more than a dozen times AND my name is in the song.
“Ignore the sun, the cover’s over my head.
I wrote a message on my pillow that says, “Jesse, stay asleep in bed.”"
Isn’t that a perfect quote for a pillow? A pillow for my workroom?!? Of course it is.
Once I had my quote, I needed to figure out how many of each letter I needed to cut out. I started with A and tallied all the A’s up, and then on to B and then C and so on and so on.
 I chose to make my letters out of Marine Grade Vinyl. The kind they use to upholster car’s and boat’s. I just happen to have a lot of hand, and I like how clean the edges are since the back is a woven polyester. Plus it just has the right “look” for the quote in my opinion.
You could also use any weight fabric with an attached fusible interfacing instead.
I cut my vinyl in to 2.5″ long strips and then cut the strips up in to 2.5″ squares. This gave me wiggle room when it came to cutting out the letters.
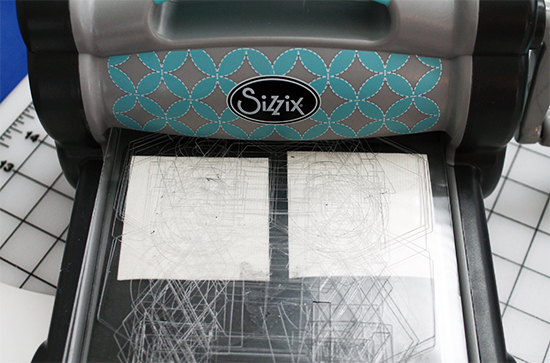
I noticed the letters on the dies were backwards, so I made sure to place the vinyl right side facing down on top of each letter. I was able to stack three vinyl pieces at a time, but I would test out your vinyl first to see what the limit would be.
I used my Sizzix Fabi, along with two cutting pads and the 1.5″ Bigz Alphabet Die Set to cut these. The recommended way to crank these through is cutting pad, then die facing up, your fabric/paper and then another cutting pad on top. Then just crank it through! FYI: It you feel a lot of resistance, then that means you have overloaded your die.
 You can see above what they look like once they come out. For the skinnier letters like the “I’, I was able to reuse the leftover vinyl on the sides.
 I also cut out a few extra I’s that I manually could cut up into punctuation marks. Once I had all the letters and punctuation I needed I set them all aside for later.
 For the background I could have very easily just cut out a solid piece of fabric, but I like my projects to have texture. In the case of this piece, the texture also doubles as a guide.
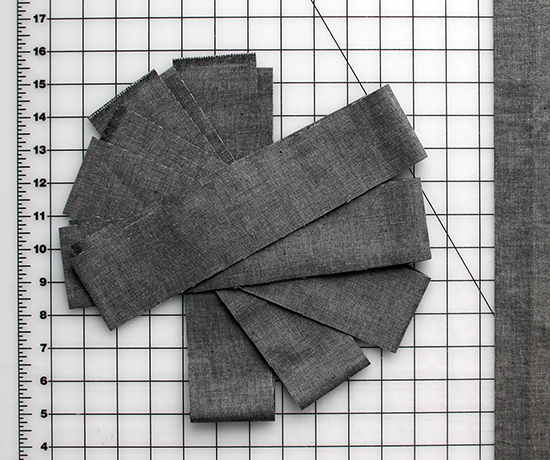
The letters I cut out were 1.5″ tall, so I needed a line guide that was 2″ tall so everything wasn’t all squished together. To start this guide, I cut ten 2.5″ strips out of black chambray that measured 20″ long each. Using a 1/4″ seam I stitched them all together along the 20″ side.
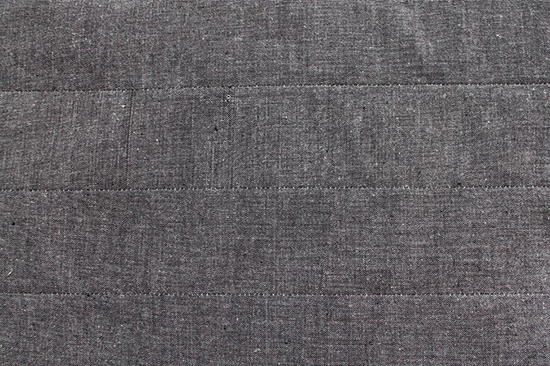 All ten strips sewn together equaled a 20″ square with 8 lines that were 2″ apart. As you can see above, the lines are very subtle. I believe that has to do with the chambray itself, some other fabrics may not blend as well.
 I wanted to make the guide just a little more useful, so I marked the center of each line with a dressmakers pencil. Then I set up the background piece near a small cutting mat I had.

My mat is 18″x24″, so it was perfect to use as a mock up for all the letters. I started from the 9″ line and went out on either side on each line to center them.
 It took some time to get it right the way I liked it. I added the punctuation later (thought I’d suggest adding it during this step)
 Now it’s time for the actually assembly! Using a little Elmers Washable School Glue on the back of each letter, start attaching the letters in place on the seam lines. I only suggest doing one line at a time.
Once the entire line is placed, take it over to your ironing board and iron the BACK of the fabric square. This sets the glue and helps keep everything in place. Do not iron the front, that will just be messy and wont secure anything.
 After the fabric cools down, take the entire piece over to your sewing machine. Using a Teflon Foot or something similar start top stitching around each letter. This took me a few hours, but it was worth it in the end because the top stitching looks so great and adds a lot of texture!

Another option is to just sew straight lines through all of the letters making sure to secure the tops and bottoms. If you used quilting weight cotton you could just leave it all as is, and just quilt over it all before assembling the pillow.
I thought I had taken photos of the next steps, but I can’t find them! So you will need to use your imagination…
Once all my letters were top stitched and all the loose threads were cut, I quickly spray basted the top to some cotton batting and straight line quilted them together. I only stitched right above each line so I didn’t sew through any of the letters. I did end up sewing through a few commas though.
For the back of the pillow I cut a piece of fabric 22″x20″ and quickly basted and quilted it using wavy lines. I always do this because I feel like it makes my pillows softer and more comfortable in the end.
Then I cut the piece into two parts, one measuring 9″x20″ and the other measuring 13″x20″. I folded down one of the 20″ sides of each 1/2″ down, ironed it and then folded it down again and ironed again. I top stitched each of these folds in place. I them installed plastic snaps in 2″ increments down the folds on each side. This basically made a pocket pillow back with a snap closure. My favorite way to finish a pillow these days.

 The pillow finished at 19.5″x19.5″, so when it was stuffed with a 20″ pillow form it looked nice and full!
I absolutely love the finished piece and I’m already starting to dream about this process using cotton with a much longer quote as the top of a quilt!!! The sizzix really does speed along these types of projects.
Supplies Used:
- Sizzix Fabi Die Cutting Machine
- Sizzix Bigz Alphabet Set 9 Dies – Block 1 1/2″ Capital Letters & Numbers
- 1/4 yard Marine Grade Vinyl in Off White
- 3/4 yard Andover Black Chambray
- Elmer’s Washable School Glue
- Off White thread
- Cotton Batting
- KAM Snaps
- 20″ Pillow Form
Pin It
Pingback: Reusable First Day of School Banner for Sizzix | an Art School Dropout's life