
 A few months back I was approached by the kind people at Janome and asked if I would like to borrow one of their new machines and give a review. I’ve only sewn on a Janome twice in my life, once was at Glamp Stitch-A-Lot last year and then when I help my daughter with her Sew Mini machine. Both times were good experiences, so I said why not.
 I was expecting them to send a nice machine, but what I got was just pure amazing!
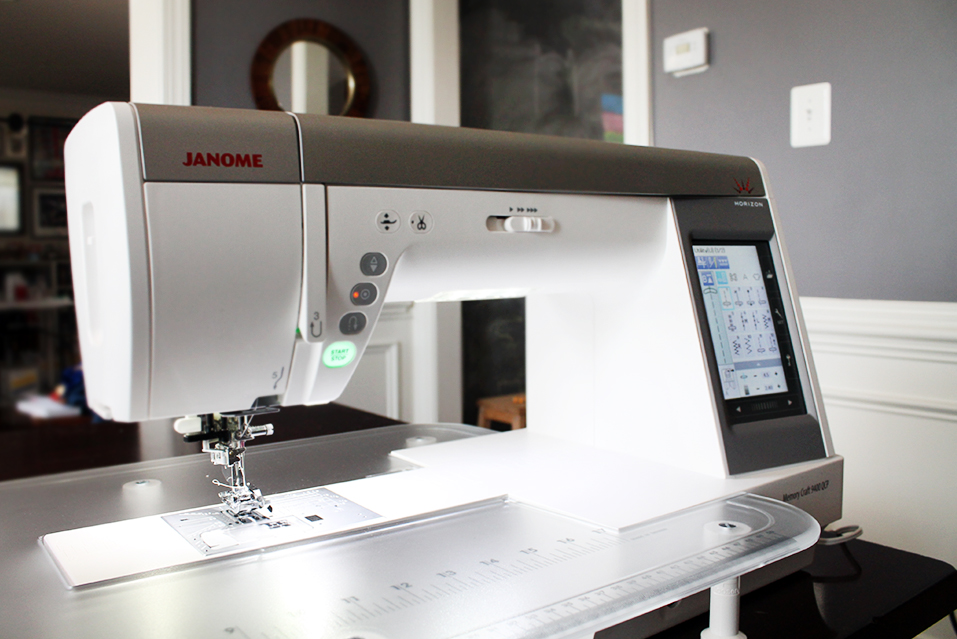
Say hello to the Janome Memory Craft 9400 QCP. It’s loaded with so many bells and whistles that I didn’t even know where to start with this review. I have a lot to say, so strap in for the long haul. Oh, and if you stick around to the end I’ll tell you how I pieced that pouch shown above…

Size:
One of the biggest features on this machine is it’s size. It’s a pretty large machine, but for all that it offers, it needs to be. It has an 11″ throat with a max height of 4.7″, so you can roll up a pretty big quilt and not have issues pulling it through. It also has a 15.5″ sewing space without the table attached, which I found to be very useful.
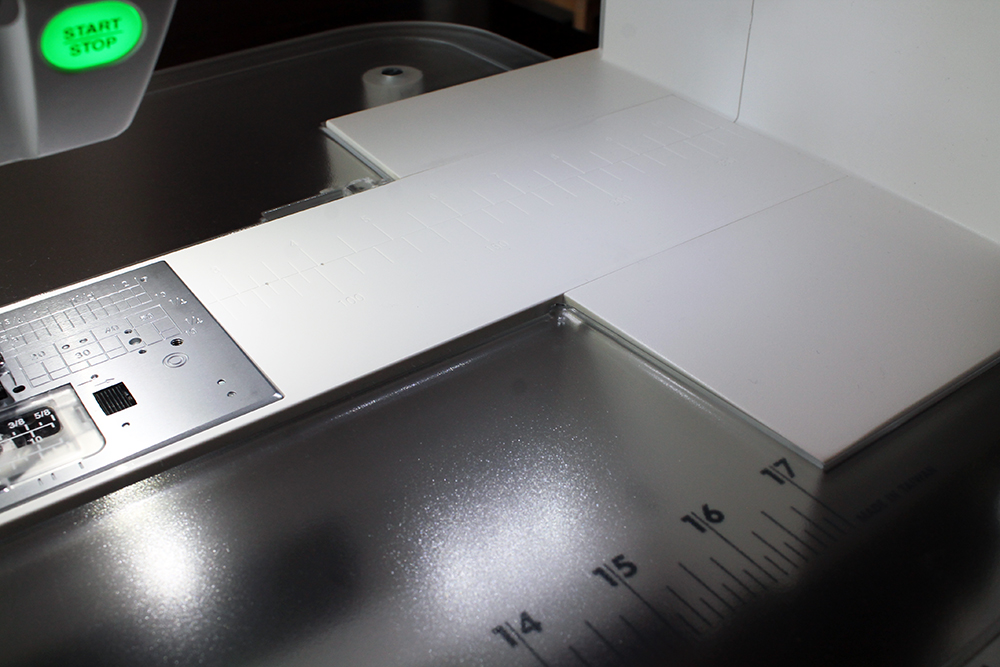 Bonus: It comes with its own extension table. This was a new concept to me, and I don’t know why other companies don’t do this. The table fit perfectly and even has these pins and notches, shown above, that keep the table in place. No shifting. The textured finish was nice too. I could pin things on the table without fear of scratching it up and ruining it forever (because that is actually an issue with me)
Lighting:
I was super impressed with the amount of LED lights above the throat area and needle.


Then got even more excited when I realized there was additional lighting in front of the needle. I tried my best to show above that you just pull it out when needed and it turns right on. You know you’re a serious sewist when you freak out over an extra light on a sewing machine.
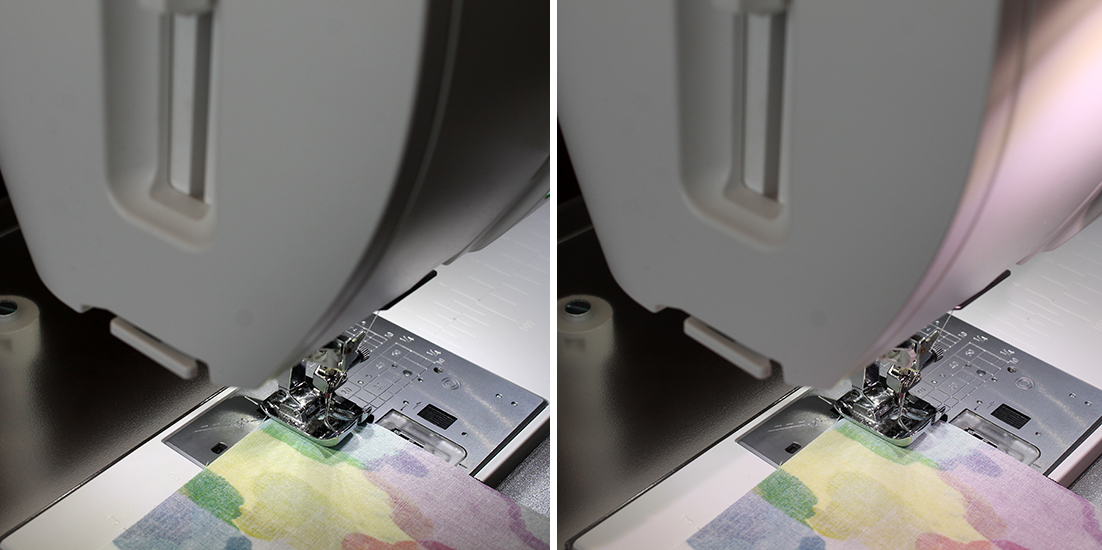 The photo above show the work area with and without the light on during the day. I wish I had done one at night, that’s when its most useful. It’s a nice white light too, so taking photos for tutorials and such at night would be a lot easier.
Extra Needle Plates:
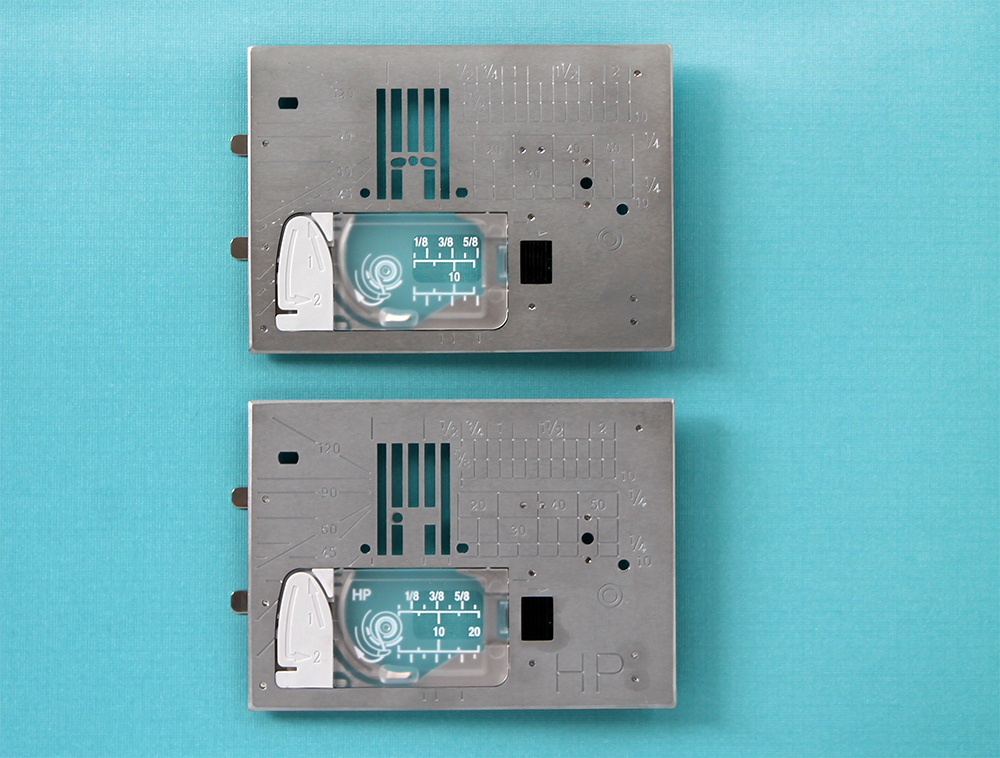
I’ve sewn on the same brand of sewing machines my entire life due to the fact that my mom was loyal to one specific brand, so I became loyal. When I purchased my first grown up machine 13 years ago, I didn’t think to even look at another brand. Which now I regret. I’ve had machines eat thin fabric because the feed dog area holes were too big. I didn’t know other companies, like Janome, offered additional needle plates! It’s genius.


There are three plates that come with this machine. One is already attached and is the basic one. Then there is the Straight Stitch Needle Plate with left needle position for 1/4″ seam foot which is great for quilters, and the there is the Professional HP Needle Plate which I’m still learning about, but so far I gathered its creates a much smoother and more even straight stitch (hopefully I understood that correctly) There are also guides on the lid that show whch stitches to use with each plate.
All I know is that I tested numerous brands of fabric on this machine and not a single one was eaten up because of the positioning of the holes on those plates. That alone is making me sad this is only a loaner.
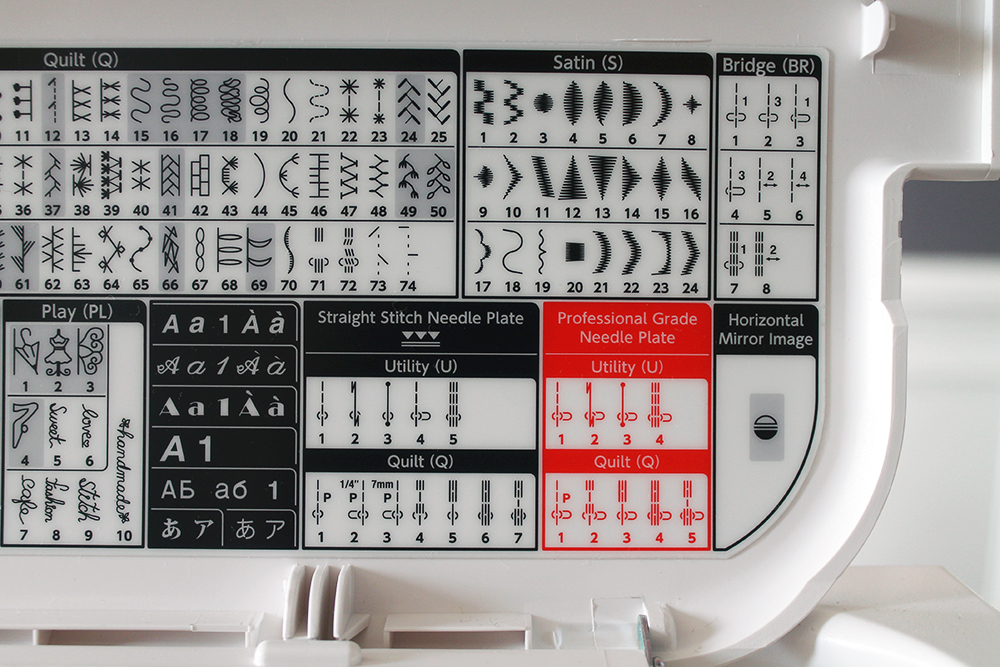
Actually Useful Decorative and Utility Stitches:

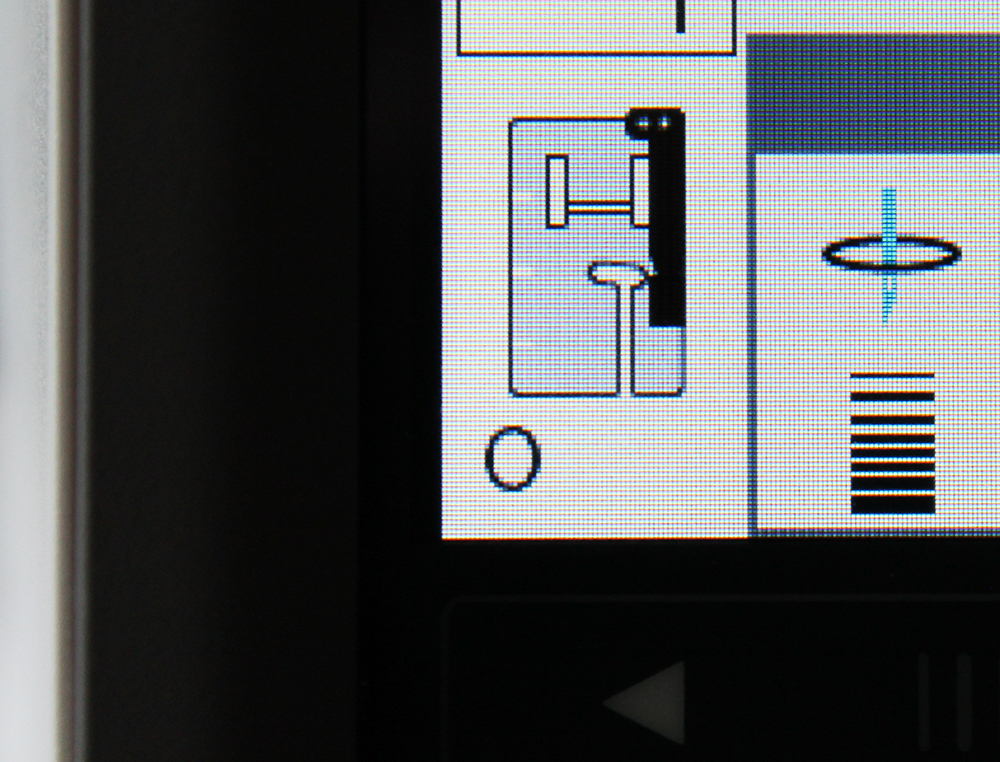
This machine comes packed to the brim with stitch options. Seriously, look at that diagram! 350 options plus 4 Alphabets. I actually tested out almost every single one of the decorative stitches and found that they were very useful for my style of sewing. The Alphabet was super useful for adding names to all my girl scouts vests too. It took seconds and you could actually read what it said.
I also like that when you chose a stitch, the machine told you exactly what foot to use. Perfect. I haven’t had much time to try out the utility stitches, but the sky is the limit with those too. Some even hove digital diagrams on how to use them, like the faux cover-stitch and the blind hem.
Storage:
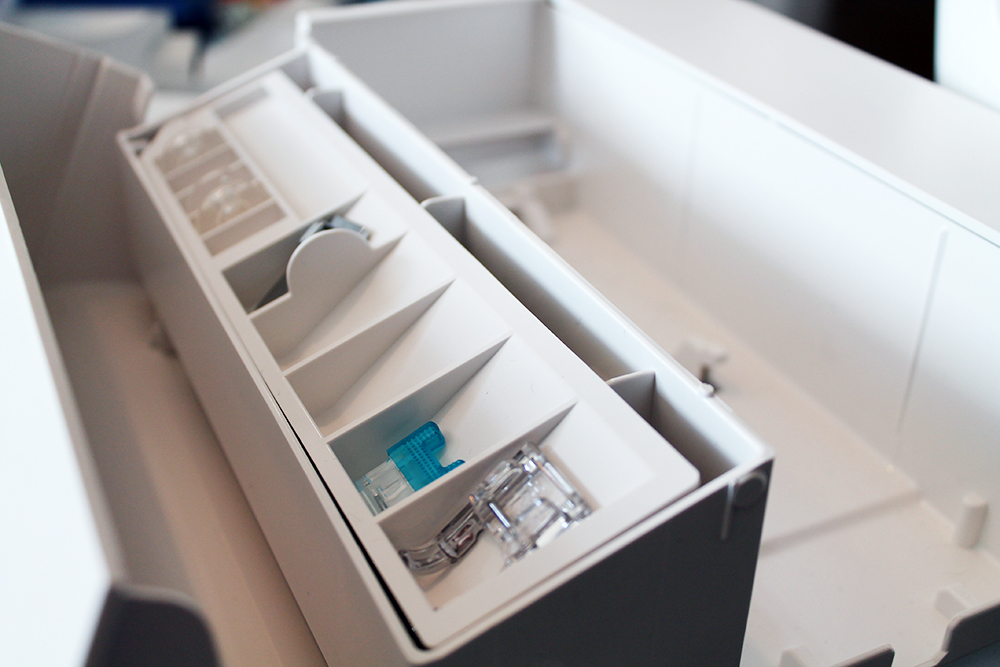
I really liked the storage options on this machine. There was the removable storage around the arm like usual, except it had two compartments instead of the one I’m use to. Then there was the little indented tray next to the bobbin winder. It was perfect for storing feet that I used often.
I also liked that there was a pocket on the dust cover. It was the best place to keep the manual for quick reference.
Speed:
 This machine is FAST. My mother was constantly telling me “it’s not a race” when I would sew as a kid, and I basically still sew the same way. So I was super happy with the 1,060 Stitches Per Minute (SPM) this machine could do.
I was also happy that you could turn the speed down. As someone with a young kid in the house who thinks she an adult, I’m glad I can let her use the big girl machine without fear of her sewing right through her finger at top speed. you know, because this isn’t a race and all.
Two Thread Cutter Options:
 This machine comes with a built in thread cutter. When I bought one of my big girl machines a few years back, the dealer asked me “do you want to one with the thread cutter? It’s just a little more” I giggled and said I could cut my own thread and left with a plain ole machine. I didn’t know any better. My next machine had one and it was like magic! Yes, you can cut your own thread, but do you know how much time it can save when the machine cuts its for you? Also it pulls the thread to the back and can knot it before cutting too. These things are basically made of magic now. Just pure magic.
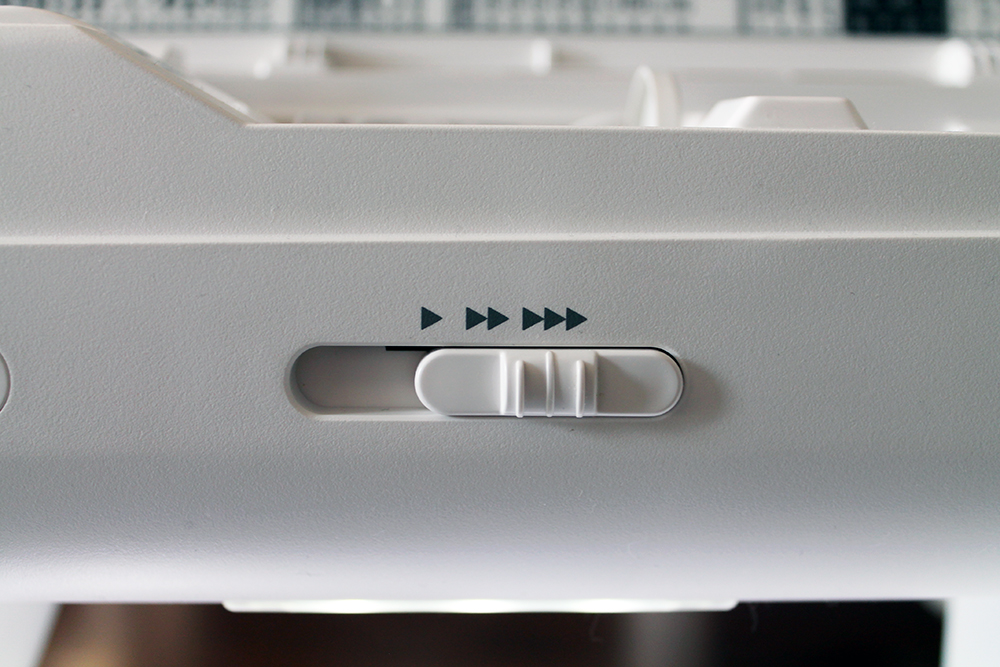
The 9400 has two options for thread cutting though, so it goes the next level with magic. The first, shown above, is a button off to the top right from the needle. You just press it and BAM the thread is cut.
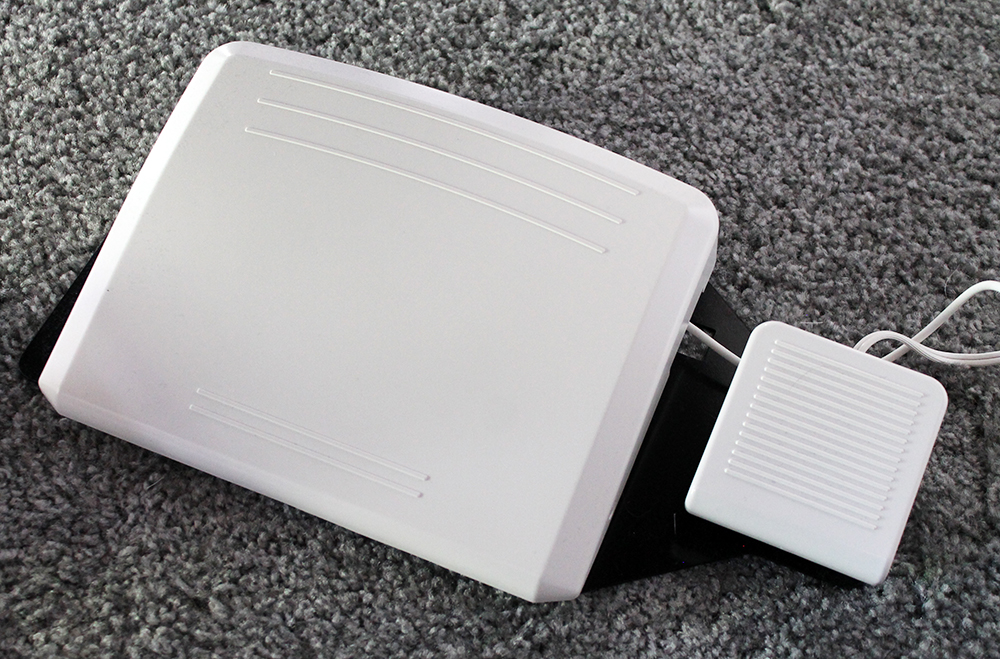
The second option if that little pedal there off to the right of the foot pedal. You just press it and BAM the thread is cut and you didn’t have to move a finger, at all! I had taken a few pretty sweet videos showing how this shaves so much time off chain piecing, but I’m still learning video editing and can’t figure out how to upload it. I may just add it to IG later this week and somehow link it here. I don’t know. If you know please message me!! Haha.
End of Review.
Beginning of Tips, Tricks and How I Put Together The Panels on That Pouch:
I figured I could write a small tutorial to show off some features while also mixing in some tips and tricks.
 I will just be showing how to assemble the panels of the pouch, this post is already very long and you can use your favorite zipper pouch tutorial to finish it up. If I have enough interest, I’ll rewrite the post I have done for many other blogs here.
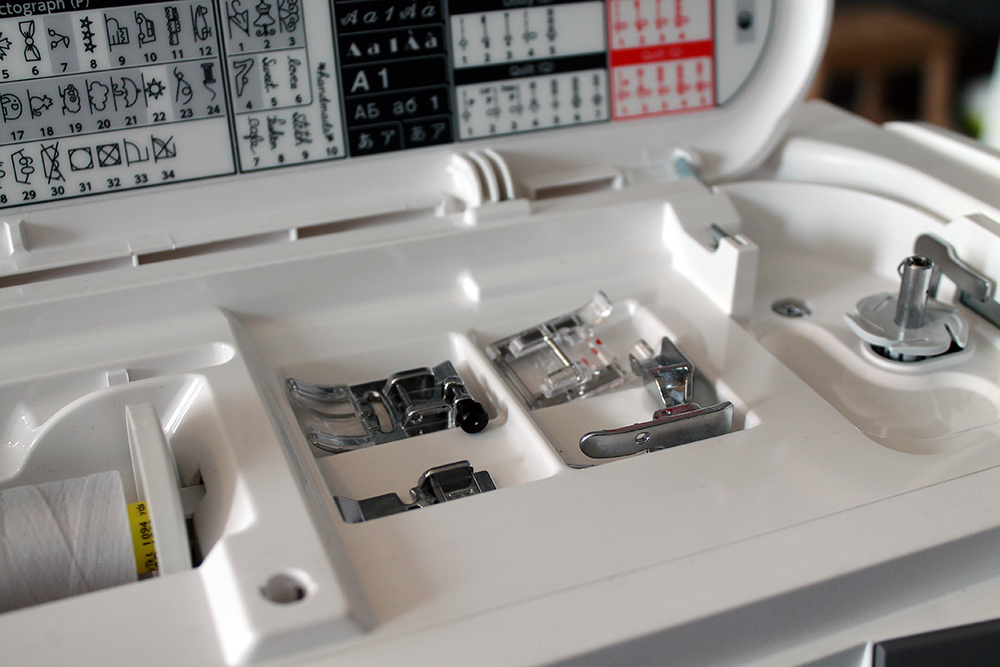
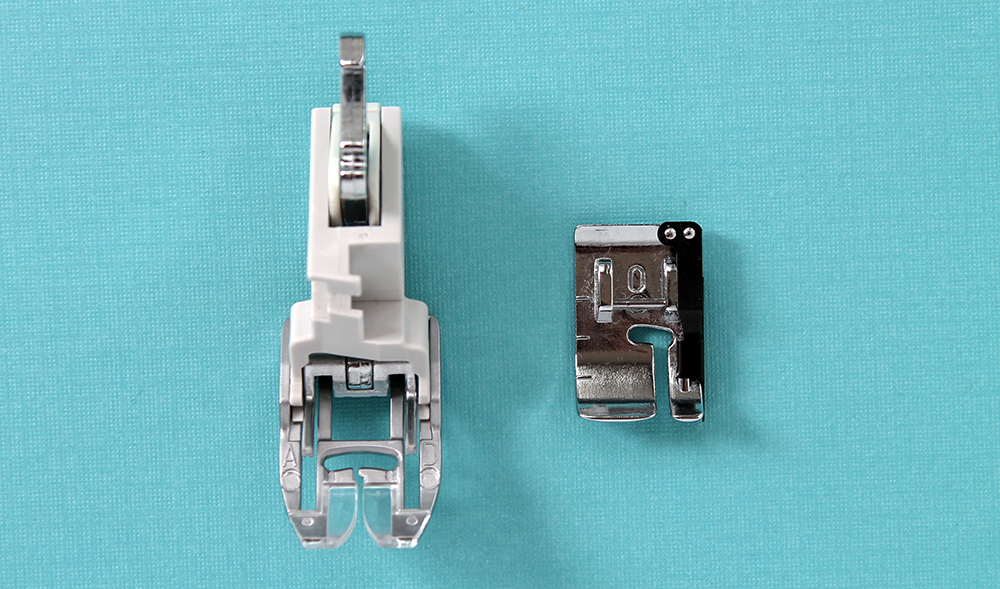
Above are the two feet you will need for this project. The one on the left is the Dual Feed foot, and the one on the right is the 1/4″ Edge foot.
Both come with the machine, which I find so refreshing. No need to keep going out and buying specialty feet that you will actually use almost everyday. The only thing I was a little sad about was that there were not any measured markings on the dual feed foot. Does anyone know if there are additional attachments? As anyone who has been reading my blog will know, I use the markings on my other machine ALL THE TIME! It’s how I do my matchstick quilting.
I used the 1/4″ piecing foot for the first half of this project.
 To set up the machine for the 1/4″ foot, you need to get to the quilting menu on the screen. First things first press the second square button with the mirrored swirly design on it.
 That will bring you to this screen. Make sure to choose the Quilt(Q) menu.
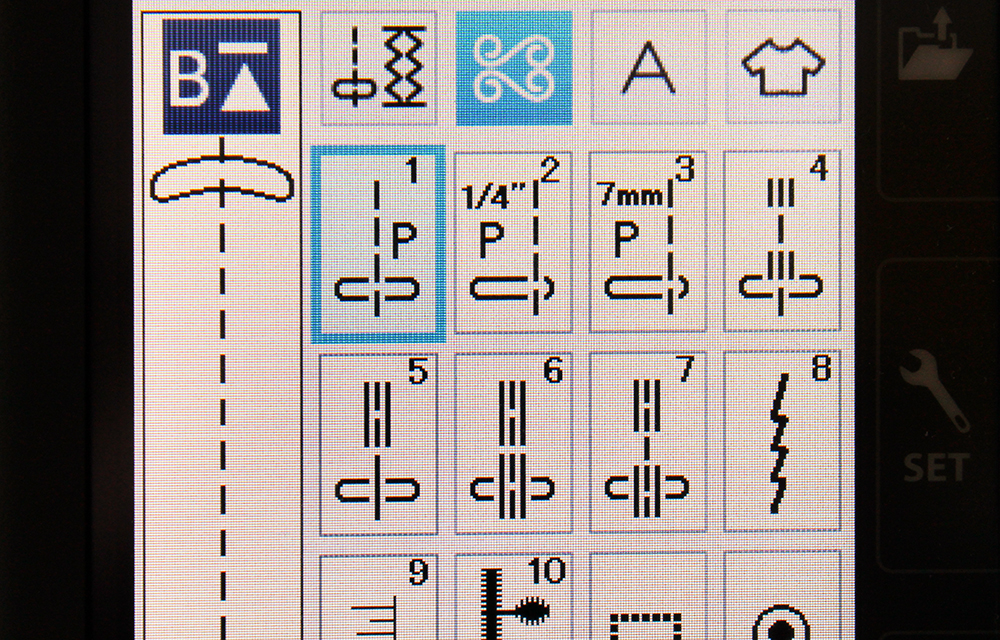
From there you will be given all these great quilting option. Choose the 1/4″/#2 option.
 Once it’s selected you will be shown exactly which foot to use.

Warning though, if you use the 1/4″ foot,but do not choose the 1/4″ option, you will end up with a 1/2″ seam. I learned this this hard way at Glamp last year.


This was a great scrap buster project btw. I was able to just pull pieces and trim them to the correct size.
Cutting Guide (cut one of each, unless otherwise specified):
- A – 2″x4.5″
- B – 1″x4.5″
- C – 2.5″x2.5″, Cut Six
- D – 1″x8.5″, Cut Two
- E – 4″x6.5″
- F – 1″x4″
- G – 2″x4″
- H – 4.5″x8.5″
- I – 4″x8.5″
Piecing:
To piece this project I started by sewing all the C pieces together, A & B together, F & G and then H & D using the photo above as a guide. I pressed my seams open because I knew I would be heavy on the quilting and because I wanted those skinny strips to have some bulk to them. Then I attached A & B to the cluster of C pieces, F & G to E and H&D to I, pressing as I went along. Then I added the last D in between the two patchwork panels.
Piece D is rather thin, I know, but this machine can handle it! I had no slipping or anything. Those thing strips went through like butter.

While photographing the panels, I realized I liked the colorful part of the top more than the bottom, so I decided to flip them (but had already photographed the first diagram, so I apologize for any confusion)
To give the pouch some structure I used scrap batting and spray basted them together. See, great scrap buster!

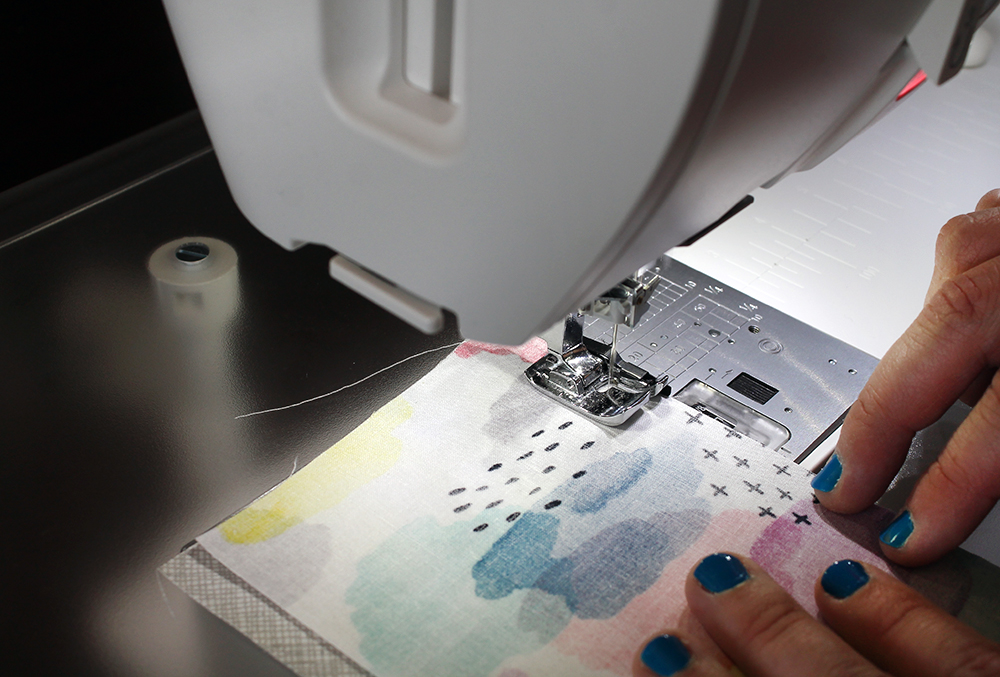
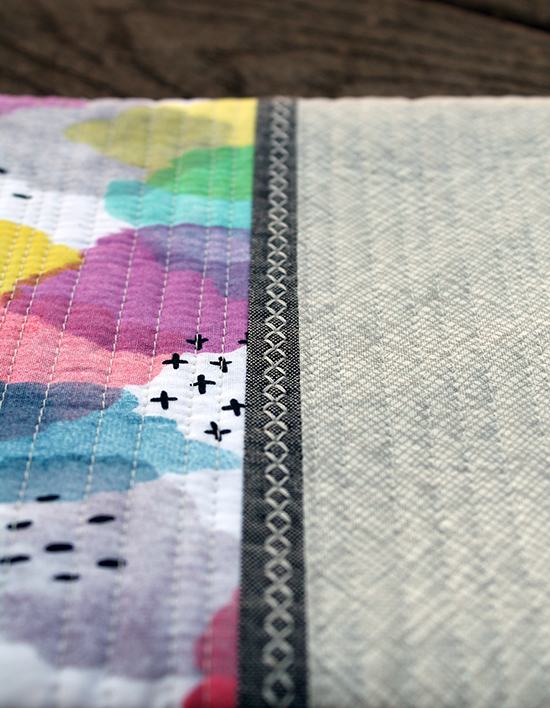
 My first step was to add the decorative stitching. I used Heirloom Stitch #29, and kept the walking foot on so I could get an even stitch with all the layers. This stitch pretty much does all the work for you, but you have to make sure you don’t tug on it while it’s doing it’s thing. As you can see in the photo above, its pushing fabric towards me, instead of pulling it away. I like to just lightly touch the fabric to keep it straight, but then do nothing else but watch.

The #29 stitch was my first choice because it fit perfectly on those thinner lines and since it doubles back on stitches, it really stands out. It also looks a little hand sewn, which is always a plus in my book. Big looks, less time.
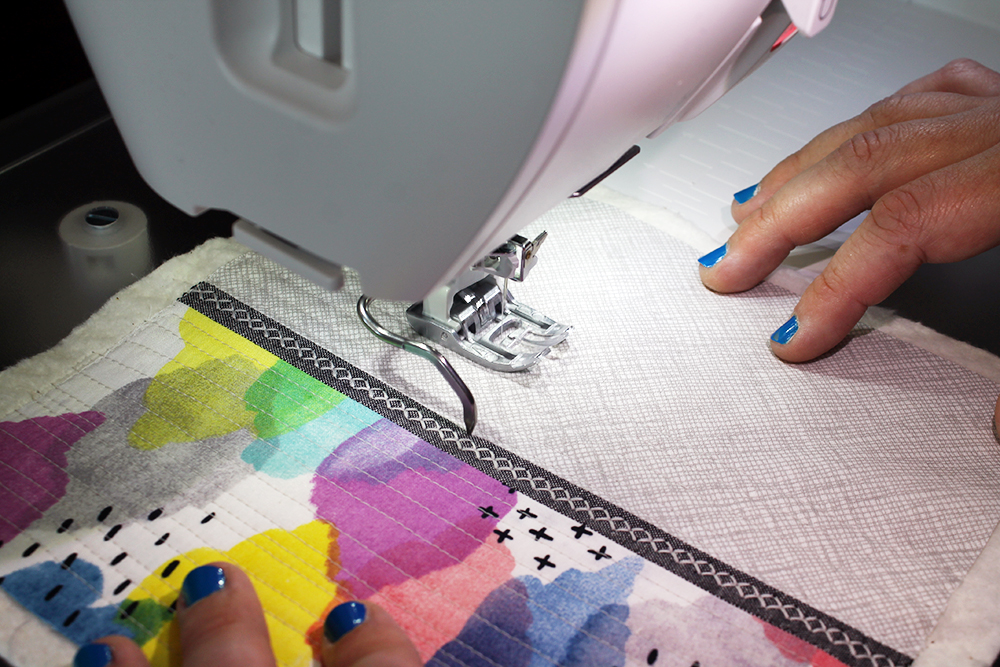
For the rest of the pouch panel I decided to do some varied width quilting. I used the guide bar that can be attached to the dual feed foot to help me keep things straight. I would just move it random each time I started a new a new line. As I show in the photo, I always kept it either straight with the center strip or with the top or bottom edge. This was especially useful in the light grey area since my thread was so close in color to my fabric, i had no idea what was what.
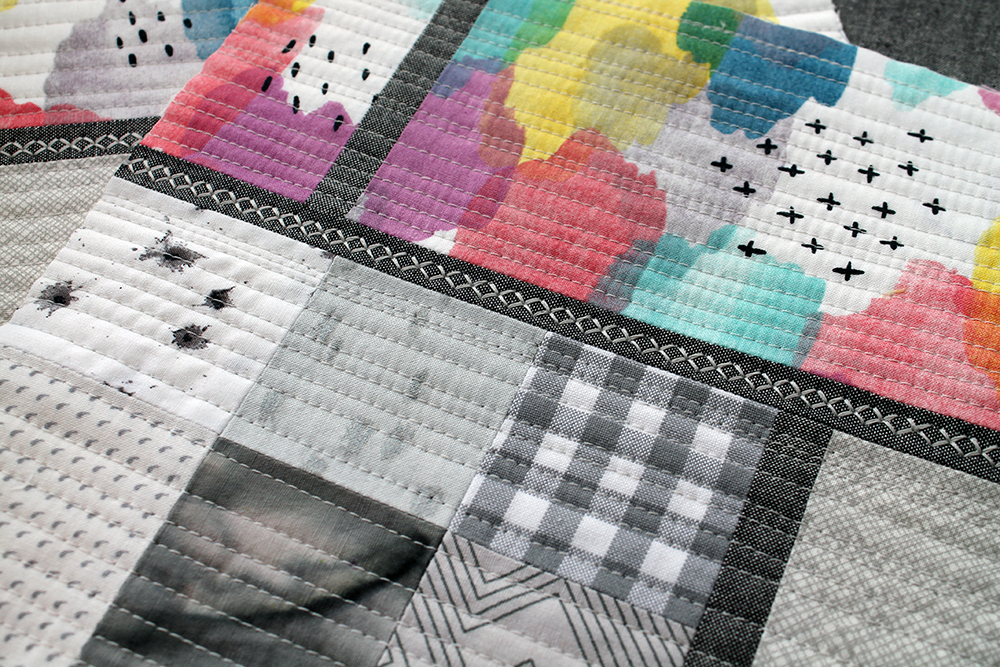
After all the quilting is finished, just trim the blocks evenly and assemble them using your favorite pouch tutorial (I have a few swimming around out there in internet land, I just can’t link to them from this post)


 I am just so in love with how this pouch ended up. Those decorative stitches were just perfect. I just want to add them to everything.
I don’t think I can even express how sad I am that this machine was just a loaner. It’s so awesome and I’ll be sad to see it go. Thank you again Janome for letting me play with it these past few months. You have a pretty sweet machine here.
Disclaimer: I was sent this loaner machine in exchange for writing a review or tutorial. All words and opinions are still my own though. I personally chose to do both because I was that happy with the machine.
Pin It
Great review and the pouch is adorable!
I want a Janome so bad I can taste it and even more so now that I see all of it’s wonderfulness!!
Thanks!