 This past weeks Just Two Words theme was Houses & Folk and the finished piece should be a set of bed linens. I chose the word Houses and Heidi chose Folk!
Just Two Words Project: Houses & Folk
4

This past weeks Just Two Words theme was Houses & Folk and the finished piece should be a set of bed linens. I chose the word Houses and Heidi chose Folk!

I talked briefly the other day about the creative Bug Fabric Design series and Spoonflower when I shared my Bugs and Teacups fabric. Well, the two companies decided to host a design contest for anyone who watched the videos! How neat is that? I thought it would be fun to enter my fabric! I just voted and figured why not share? I’m not going to ask you to vote for me, because that’s just not me, but instead I will ask you to go vote for the designs YOU like best!! I like things to be fair.
 Today was a GREAT mail day! I received a few envelopes full of new fabric swatches from Spoonflower.

QuiltCon is less than a week away and I just now finished my first sewing project for the trip! I had this crazy plan to make two tote bags (one featuring my fabric and one as part of a contest/promotion that I’ll talk about later), a drawstring bag, a makeup bag, a zipper pouch, a dress, a brooch, and a 100 or so hexagon pins to hand out. Whew, yep, crazy lady here. Most of the projects are about 75% done, which is pretty impressive for me. I’m normally a “the night before a trip and I am still sewing and refuse to sleep until I get on the plane” type of girl. I think I was just too excited about all of this selfish sewing!
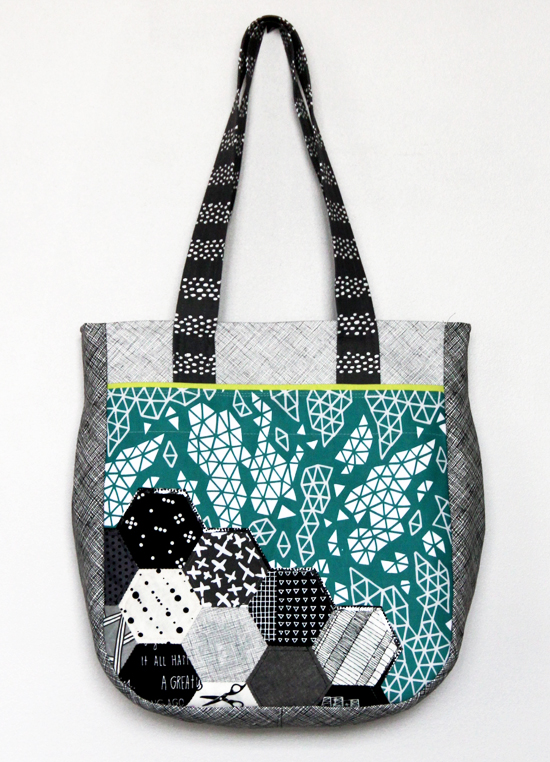 Ok, now let’s actually talk about the bag I keep showing photos of! This is the most intricate bag I have ever sewn from a pattern. Do you see those gusseted sides? Normally when I need a tote bag I just throw some squares and some straps together and call it a day. This is QuiltCon though! I will be surrounded by loads of other talented people who appreciate what goes into such projects. So no thrown together bags for this event.
Instead I made a Super Tote using a pattern I bought from Noodlehead. The pattern cost $8 and is worth every single penny.
As for the fabric I used my own designs printed by Spoonflower for the front, straps and zipper pieces (if theres any interest I’ll put them up in the shop next month). The sides, lining and top front piece are from Carolyn Friedlander’s Architextures line through Robert Kaufman fabrics. There is also a hint of Alison Glass’s Grove fabric in beet as an organizer in the front pocket. All of the hexagons were actually taken from another project I’m working on and the fabrics are by different people. The shiny fabric around the hexagons and used as zipper ends is a glossy black oilcloth I bought years ago for embroidered collages I use to make. There is also a bunch of heavier weight interfacing used that helps give the bag its shape and strength. Overall, I think all these fabrics blended so well together and really show my personal taste!


This inside of this bag was actually really hard to photograph! It was so dreary here and I just couldn’t seem to show just how spacious and versatile it is! I altered the inside pattern slightly by adding a zippered pocket on one side. This was to securely hold my inhaler, medication and anything else I truly can’t live without. Plus I like to have these items separated from everything else so theres no digging around, freaking out, while having an attack.
The rest of the divided gathered/elastic pockets were part of the pattern. They are perfect for an event like Quiltcon where I’ll be picking up random bits and pieces all weekend and I’ll be able to divide them up and not just have a mound of crap on the bottom of my bag. Plus I’m taking a workshop one of the days, so this way i can keep my supplies separated from anything else I buy or am given.

This bag also has two options when it comes to the main zipper on the top. You can either have a zipper, or not have one! I chose to add the zipper to this bag, and omit it on the second one (purely because I forgot to buy a second zipper) The instructions made it so easy to install it, which has made me way more comfortable with the idea of always adding a zipper. (I already have plans to make loads more of these bags)
 The front pocket was even harder to photograph than the inside! It’s so slim and flat, it just wouldn’t stay open. As with the interior of the bag, I also altered this part a little to fit my needs. I had seen on the From A Blue Chair blog where Kati added a small organizer type of pocket inside the front pocket. It was brilliant! (you should check out her post too! She did a few other alterations that were great and worth reading about!) So I used a super bright purple fabric and stitched up three dividers to help me hold my phone, business cards and extra pens (or business cards I’m given). This way I can get to all of those items super fast without taking the bag off my shoulder.
As you can see, I used a magnetic closure to secure the pocket when not in use. The pattern suggests this option, velcro or nothing at all. I think the magentic closure looks best. Thats just my opinion though.

 I think thats it. Who knew I could type so much about one bag? Wait until I start talking about the next bag!! Hahaha.
If you will be at QuiltCon, please look out for a girl with purple hair, carrying this bag! If you see me, please come say hi. I have some sparkly goodies for anyone who does.
P.S.: Everytime I look at that last photo all I can think of is Alec Baldwin in 30 Rock asking “It’s weird. What do I do with my arms?”
Pin It
Earlier this week I hit 3,000 followers on Instagram. As a thank you to all of the inspiring, creative, ambitious and supportive people I have met through this social networking portal, I set up a giveaway. I made the above two mini quilts specifically to say thank you. I made one Black, White and Gray for all my followers who I know love the basics, and then I made a rainbow sprinkle one for all those followers who are colorful and bubbly.
They are each 7″ square and hung from a walnut dowel that has not been stained, but was just left its natural color. I loved making these, because I finished them in a day which gave me a feeling of accomplishment. I’m all for projects like that!
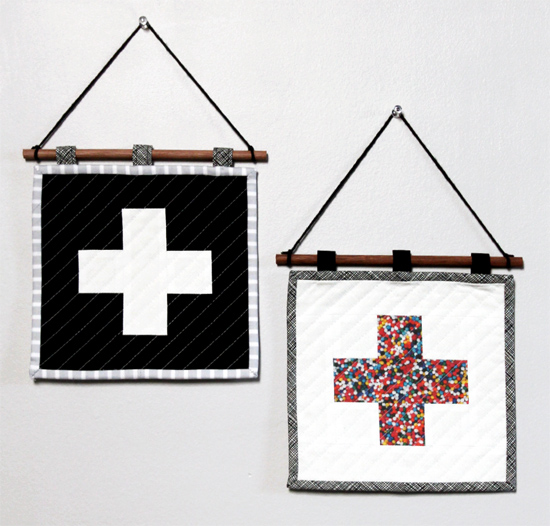
 I know I will probably get asked where the sprinkle fabric is from, and I’m sorry to say it can’t be purchased. I made it for my own personal use from a photo I took of an entire bottles worth of sprinkles. I get it printed on a fat quarter and just cut small pieces from it, and I have no idea how to make it into a repeat pattern. If anyone else is interested in just fat quarters too, let me know and I’ll set up a listing on Spoonflower.
Oh and while I have your attention, I would like to thank you too!! Thank you for reading my little blog and encouraging me to continue!!
Pin It
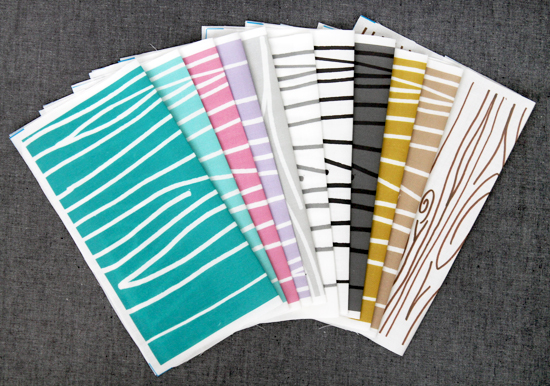 A few weeks back, I had a flood of messages on Spoonflower asking about different colorways for my Wonky Woodgrain Fabrics. It seems like faux wood grain is the new thing for nurseries. How neat!?
I read each and every request and made up new colorways, or made some of the designs horizontal instead (for crib skirts and things like that I was told). I had to order a swatch for all of them so there was some waiting involved.
Today all of the swatches came in and I am in love with them all! A bunch were requests and then the tan, mustard and pink were my idea because I know I’d use them myself (baby quilt backs anyone?)
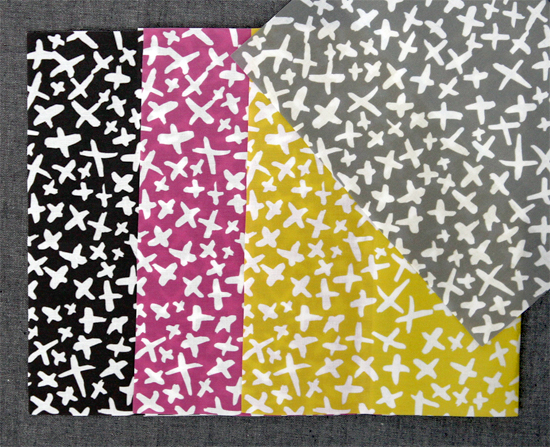 I also had a few swatches made of my Brushed X’s fabric design. I designed this specifically to be used as quilt binding and backing. I have grand plans for this fabric! (I wish I had photographed them better though! Stupid cloudy days)
What are your thoughts on all of these? Should I make more colorways? Smaller designs? Larger designs? ETC ETC ETC? I NEED to know! haha.
Pin It