My “Carolyn Friedlander’s Favorites” EPP Hexie Pillow

My "Carolyn Friedlander's Favorites" Hexie Pillow {an Art School Dropout's life}
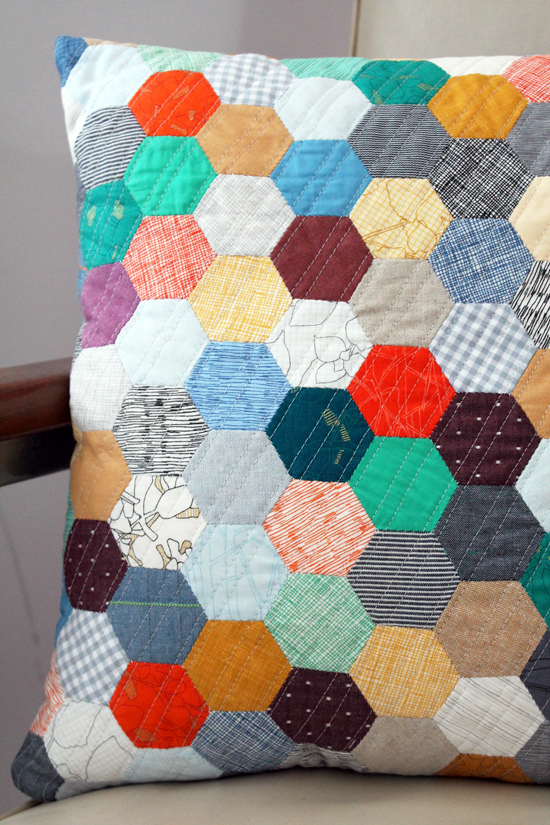
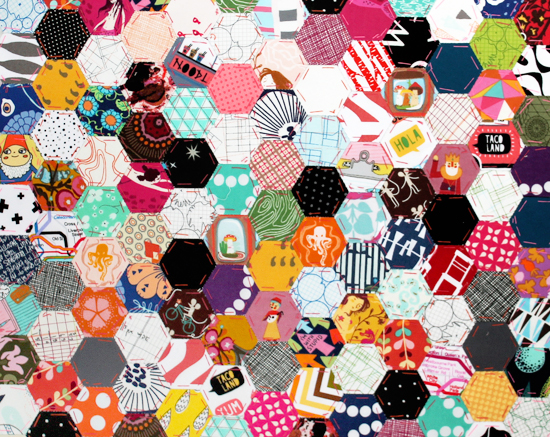
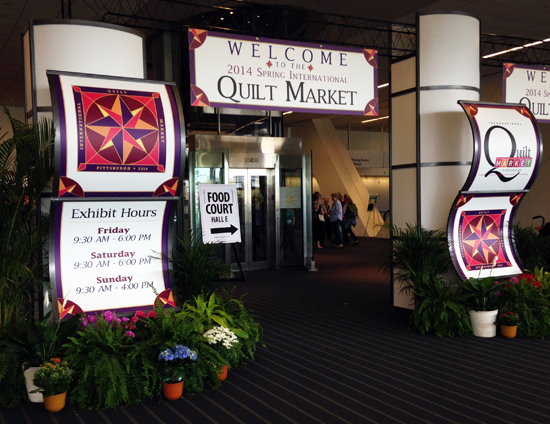
I had mentioned a few weeks back that I was working on other hexie projects that were almost finished. Well, here’s one of them!! It’s a pillow made completely from mini charm packs, specifically the Carolyn Friedlander Favorite’s mini charm packs I was given when I visited the Robert Kaufman booths at Quilt Market. It’s a mix of Carolyn’s newest line Botanics and a bunch of different solids by Robert Kaufman.

My "Carolyn Friedlander's Favorites" Quilted EPP Hexie Pillow {an Art School Dropout's life}I was so excited to get a hold of these little things, and I seriously cut right into them the second I got home. Well, after I made custom paper hexagons specifically to fit these with little waste. I used my Silhouette Portrait to do that btw.

I documented the entire process on Instagram, so I’ll be sharing some of those photos too.

My "Carolyn Friedlander's Favorites" Quilted EPP Hexie Pillow {an Art School Dropout's life}
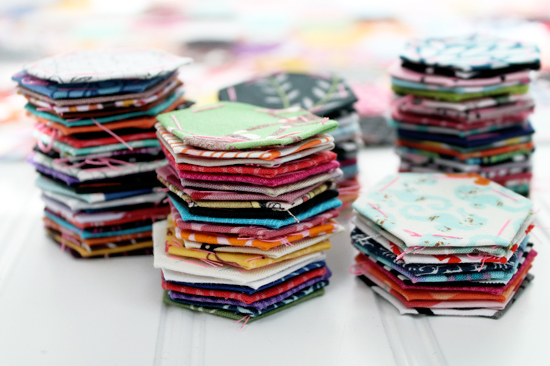
Making the hexies themselves took no time at all. There were 120 2.5″ squares total (3 mini charm packs worth) and I can do about 35-40 a night. The part that took me the longest was whipstitching them all together. There wasn’t too much rhyme or reason to where I placed everything, I did make sure to keep similar pieces as far apart as I could, but thats it.

My "Carolyn Friedlander's Favorites" Quilted EPP Hexie Pillow {an Art School Dropout's life}
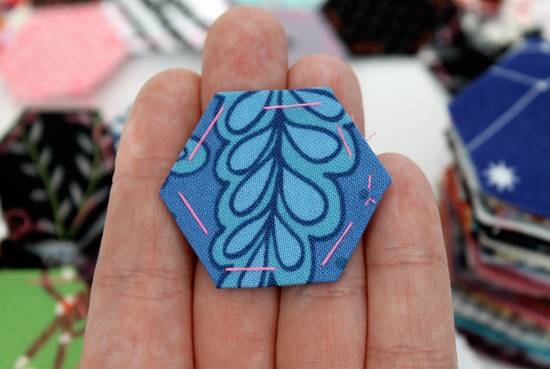
I know some people stitch their hexies on the bottom and don’t go through the paper, but I found that doesnt work for me and my slightly uncoordinated hands. I work much cleaner and faster when i baste through the paper. You can see me taking out the basting stitches and papers above. I always use neon pink thread because it allows me to see every stitch so i don’t miss any before quilting.

My "Carolyn Friedlander's Favorites" Quilted EPP Hexie Pillow {an Art School Dropout's life}The above photo was just taken for fun! This was right after taking all of the paper out and steam pressing the entire thing. Isn’t it pretty?

My "Carolyn Friedlander's Favorites" Quilted EPP Hexie Pillow {an Art School Dropout's life}I seriously could not decide how I wanted this thing quilted. I’m really only good at straight lines and tracing around objects right now, so to make sure I secured all the hexies and still had a pretty design in the end I went with the above combination. I used the edge of the hexies and the edge of my basic walking foot to line up all of the lines. It went pretty fast this way and I absolutely love the texture it added.

My "Carolyn Friedlander's Favorites" Quilted EPP Hexie Pillow {an Art School Dropout's life}
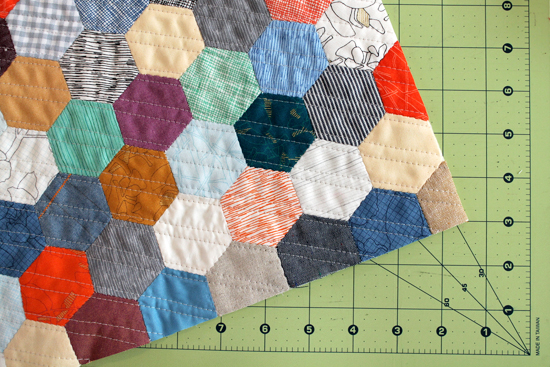
I squared off the edges, quilted a simple back piece using Robert Kaufman’s Essex Yarn Dyed in Denim, added an invisible zipper and stitched the entire thing together…

My "Carolyn Friedlander's Favorites" Quilted EPP Hexie Pillow {an Art School Dropout's life}Tada, I have a finished pillow! One that has already been taken by my four year old as her own. She even gave me a hug and said thank you for making it for her. Ok, I guess it’s hers now.

My "Carolyn Friedlander's Favorites" Quilted EPP Hexie Pillow {an Art School Dropout's life} My "Carolyn Friedlander's Favorites" Quilted EPP Hexie Pillow {an Art School Dropout's life} My "Carolyn Friedlander's Favorites" Quilted EPP Hexie Pillow {an Art School Dropout's life}I’m waiting on an invisible zipper for my other hexie pillow I’ve been working on. This one actually IS for my daughters room. I’ll post photo’s of that project soon enough.

Who knows though, I might start working on a 5th and 6th hexie project too! I may be a little obsessed…

Pin It

My Modern Maples Quilt: Finally Finished!

modernmaples_2014_001It’s been almost 16 months since I started this quilt! I even wrote a blog post about it back in December of 2012! It’s the Modern Maples quilt pattern from Amanda of Hey Porkchop and can be found in the Pretty in Patchwork: Holidays book.

It’s the biggest quilt I’ve made to date, and I think that was a bit daunting. It was supposed to be a gift for my sister two Christmas holidays ago. I felt horrible that it wasn’t finished and finally took the plunge this past week to quilt it and bind it. Perfect timing too, because last week was my sisters birthday and I couldn’t think of anything to make her.

I seriously finished this thing AN HOUR before her birthday lunch. AN HOUR! So I apologize for the lack of awesome photos, I didn’t have time to plan them out. She loved it and put it on her bed right away. That’s always a good sign.

modernmaples_2014_002 modernmaples_2014_003This was the first unfinished project that I finished as part of my time off from Art School Dropout! If this shows anything, I think I made the right decision.

Pin It

WIP: My Crazy Scrap Busting Rainbow Hexie Project

My Crazy Scrap Busting Rainbow Hexie Project by Jessee M {an Art School Dropout's life}Apparently hand sewing hexagons has become a bit of an obsession with me. I love it, and it really calms me every night before bed. I know I haven’t shown more progress with my first EPP quilt and I probably look crazy for starting ANOTHER one, but trust me, it makes sense. Black, White & Gray fabrics are hard to come by and add on to that I’m super picky, so that quilt will be a long term project and will only progress when I buy more fabric.

In the meantime I started the project above. It’s a much smaller hexagon and enables me to use up the enormous amount of scraps I have accumulated over the years. Plus I can trade for more scraps because a lot of people hoard them too.

My Crazy Scrap Busting Rainbow Hexie Project by Jessee M {an Art School Dropout's life}When I first started this project my plan was to just make a pillow, I nice 18″ square pillow. Though once I reached that size I just didn’t want to stop, plus I had a lot of hexies leftover. So I decided to keep going and make either a twin size quilt, or a 90″ square lap quilt. So just like the first hexie quilt, this will be a long term project and can only progress when I find more scraps or buy small amounts of fabric. Which I’m fine with.

My Crazy Scrap Busting Rainbow Hexie Project by Jessee M {an Art School Dropout's life} My Crazy Scrap Busting Rainbow Hexie Project by Jessee M {an Art School Dropout's life}The best part about the random nature of this quilt is any fabric goes. It can be super simple, super weird or just plain solid color. It all goes together!

My Crazy Scrap Busting Rainbow Hexie Project by Jessee M {an Art School Dropout's life} My Crazy Scrap Busting Rainbow Hexie Project by Jessee M {an Art School Dropout's life}I also love how I can be a little silly in where I place certain pieces too! I’ve been enjoying combining phrases with illustrations of people and animals. Like the examples above! I’ve been holding onto that “I’m With Stupid” fabric for many years and never knew what to do with it. I also have this awesome food truck fabric with a bunch of word bubbles that I use throughout.

I’ll need to make over 3,000 hexagons so I get loads of chances to mix this little easter eggs in.

My Crazy Scrap Busting Rainbow Hexie Project by Jessee M {an Art School Dropout's life}Yet again though, since this is a long term project I still need to keep my hands busy while watching tv at night, which means there is a THIRD & FOURTH hexie project I will be sharing with you all soon. I just have to quilt them both, which means they are mostly DONE! (Yes, I am a crazy lady)

Have any of you started one of these projects because you saw my progress on here or on Instagram? If so, please share!!!

Pin It

2014 Spring International Quilt Market: My Absolute Favorites

I talked a bit about my experience and such at the 2014 Spring International Quilt Market yesterday. Today I want to share my absolute favorites. The lines that I know I will buy every piece from and make loads of pretty stuff with.

2014 Spring International Quilt Market: My Absolute Favorites {an Art School Dropout's life}To start I have to share everyone’s favorite, the first line from Cotton & Steel. They have a great story and are all very talented, so you should read up on them more to see what i’m talking about.

2014 Spring International Quilt Market: My Absolute Favorites {an Art School Dropout's life}

2014 Spring International Quilt Market: My Absolute Favorites {an Art School Dropout's life} 2014 Spring International Quilt Market: My Absolute Favorites {an Art School Dropout's life}Every single design from them is brilliant, and it all coordinates perfectly. So there loads of mixing and matching. It’s all very playful and vibrant and a few designs incorporate metallic colors which I’m loving right now.

2014 Spring International Quilt Market: My Absolute Favorites {an Art School Dropout's life}Though, I won’t lie, I’m most excited about their basics line. The dashes, cross hatches, lines and more are totally on my “must buy” list. I always prefer the basics, but they aren’t usually this perfect. I’ve already sketched out a quilt that would showcase these all perfectly.

2014 Spring International Quilt Market: My Absolute Favorites {an Art School Dropout's life}Next on my list of absolutely perfect was everything in Carolyn Friedlander’s booth. I was in love with her last line Architextures, and I’m even more in love with her newest line Botanics. I also had the pleasure of meeting her and chatting a bit. She’s even sweeter in person than she is online!

2014 Spring International Quilt Market: My Absolute Favorites {an Art School Dropout's life}2014 Spring International Quilt Market: My Absolute Favorites {an Art School Dropout's life}I left her booth with a few mini charm packs that showcased her line, plus some of Robert Kaufmans basics. I’ve already cut into them all and can’t wait to share the piece I’m making, it’s just taking me a bit to finish.

2014 Spring International Quilt Market: My Absolute Favorites {an Art School Dropout's life}I also was a fan of everything else Robert Kaufman put their name on! Their Kona Cottons are a staples in all my projects, plus I picked up a bunch of polka dotted fabrics which will probably be used a lot soon. Check out that diamond fabric garland in the Blueprint Basics booth! I so badly want to recreate it.

2014 Spring International Quilt Market: My Absolute Favorites {an Art School Dropout's life}The last of my ultimate favorites was the awesome American Made Fabrics solids. They were gorgeous and person and I’m always a sucker for pretty solids. Plus look at those ottomans!!! I know a very cute little girl who would love one of those.

Ok, so that’s a wrap on the Quilt Market photos. I still have more to say about some of the things I brought home with me, but I promise this is the last photos from the actual event.

Like I said yesterday, I was inspired so much by just walking around this event. Then add all the conversations I had and I am set. It really made me 100%, fully realize, how much I love sewing, quilting and everything involved. It’s how Art School Dropout started actually, I was hand painting SEWN bags! I came home realizing that I want to be a part of this industry MORE, and I have sat here all week trying to figure out how to balance all my goals with all the stuff I’m already doing. I haven’t figured it out yet, and I’m not sure when I will, but I do know change is coming and it makes me really happy!

2014 Spring International Quilt Market

qm_sp2014_001I mentioned the Spring International Quilt Market last week when I talked about the quilt I made for Silhouette America’s booth. Well, as thank you they made it possible for me to go to market!!! It was in Pittsburgh this year, and even taking back roads it only takes us 3 hours to get there. We had some hotel points and I had money put aside for BlytheCon that I could make up, so we figured “why not?”, and drove up last minute.

I figured it would be awesome just to see some online friends in person along with seeing all the new fabrics coming out. Little did I know just how much was there. Every type of tool of the trade was featured, from sewing machines to interfacing to thread and more! It was very inspiring and totally awesome. I left with so many ideas swirling around in my head, and a little anxiety trying to think of how I would make the time to try them all out. I’ll talk about all that at another time…

I didn’t bring my nice camera, but luckily there was a lot of natural light in the convention center. I took SO MANY photos, and decided I’d share a few (or a bunch, all depends on what you think a few is. haha) of my favorite fabrics coming out soon.

I’ll warn you now, theres so many, they take up two posts!!

qm_sp2014_002One of the first booths I saw walking around was the Irome Collection by Kokka. I absolutely love the large scalloped pattern!

qm_sp2014_005Actually, most of the stuff Kokka had was awesome! Check out that calendar/numbers print and ALL the Hello Kitty Prints! I wish I had looked at the proper names for the collections. I was just a bit overwhelmed! I so badly want to recreate that gray bag, so if you know what line this is, please tell me!!!

qm_sp2014_003 qm_sp2014_004Alexander Henry Fabrics is putting out more of their “the Ghastlies” line. It’s just as awesome as the last ones!

qm_sp2014_007Tula Pink has a new EPP hexagon kit coming out. I love the look of the warped hexies and I love how the box comes with everything you need. Also, as always her quilting is gorgeous.

qm_sp2014_008I have some pieces from the Riley Blake Geekly Chic line, and love them. The pieces from the new Geekly Chic 2 line are just as cool. I’m already picturing a dress out of the camera fabrics.

qm_sp2014_009I love the jewel tones featured in Katarina Roccella’s line Indelible for Art Gallery fabrics.

qm_sp2014_010 qm_sp2014_011Dear Stella‘s entire booth was super cute! Plus I’ve already had an eye on their Wee Gallery line ever since I discovered Nicole of Modern Handcraft (who made the adorable little dress up piece above). I had the pleasure of meeting her at the event! It’s awesome to meet someone with similar style who just happens to be super nice too.

qm_sp2014_006I also had the pleasure of meeting and briefly speaking to Thomas Knauer the author of Modern Quilt Perspectives. He was super energetic, nice and spoke freely when I asked him questions (rare these days). I absolutely loved the way he made his sign and I wish i could have taken all of his quilts home with me!

I also had the pleasure of meeting a few other friends and such while wandering around. Plus I was able to talk to a handful of industry experts and ask loads of questions and trade some business cards. It all makes me wish I could just play with fabric all day, every day!

Like I said before, I have more photos to share tomorrow. More specifically my four favorites. So if it doesn’t bore you, you should come back and check it out!

Appliqued Baby Quilt for Silhouette America

Early last week I was contacted by my “handler”, Jeana, over at Silhouette America and was asked if I would like to make a quilt for them. It would need to be finished pretty quickly and would need to showcase how to use their products in quilts. The icing on the cake? It would be used in their booth at the spring International Quilt Market. Yeah, that last sentence made me say “YES! of course!” as quickly as my fingers would allow.

If you’ve been reading my blog or following me for a bit, you know I am a huge fan of fabric! I love sewing with it, designing it, and just plain touching it! (not in a creepy way, I promise) So of course I’ve always wanted to GO to Quilt Market. It’s not open to the public and you need to have credentials to go, so of course I haven’t had the chance YET. So the idea of something I made going instead was the next best thing.

qm_silhouette_quilt_001 qm_silhouette_quilt_002I used this cut file from the Silhouette Design Store and cut it all using my Portrait and Silhouette’s sewable interfacing (that they provided). If I had tried to cut out those letters by hand it would have taken me FOREVER! With my Portrait it only took about an hour. Most of that time was spent ungrouping the letters and figuring out the best way to utilize my supplies.

qm_silhouette_quilt_003I could have just used a solid piece of fabric for the background, but can you imagine trying to line up letters on solid fabric? Let alone patterned fabric? I chose to do 4″ squares in an assortment of, low volume, gray fabrics. They add a bit of whimsy to the quilt AND gave me a built in grid to work with. I also set up the cut file in Silhouette Studio on a grid that mimicked the quilt and printed it out as a guide. I doubt I would have been able to line everything up without it.

qm_silhouette_quilt_004To attach all the letters to the background I pinned the quilt top to my ironing board, while using my clear grid ruler to square everything up. This process made it so I could only do one line at a time, which is another reason I’m glad I had the guide! I knew that If I followed it, every line would match up with the one below it. It did!

I used a dry iron and made sure to give attention to each letter so they were secure and could deal with lots of manhandling (aka: quilting). After each letter was ironed on and cooled down, I went right ahead and started stitching a straight line 1/8″ inside each letter. I felt like the top stitching gave it a neat look AND secured the letters in case I missed a spot ironing. This was probably the longest process, but it was worth every second.

qm_silhouette_quilt_005As for quilting the whole thing, I went super basic! I used the background squares as a guide one last time and just stitched across them like a chain link fence. I kept the binding neutral again, using a gray polka dotted fabric, because I wanted to words to stand out as much as possible. It was their show, not the rest of the quilt! It was just the back up singer. Oh and the back is a nice black essex dyed linen, super simple.

I am so happy with the outcome of this quilt! I feel crazy for finishing it as quickly as I did, but it was worth all the hard work. I really wish I had taken more progress shots though. I feel like this would have made a nice step by step tutorial. Should I make another, smaller one, to show the process? Would anyone be interested in that?

Disclaimer: First off, I only used the phrase “handler” because it’s funny to me. Also, I THINK this would be considered a sponsored post. I’m not sure. Silhouette provided the supplies but in the end the quilt is theirs, forever. So maybe it’s a gray area? Though even if they hadn’t provided the supplies, this style quilt was still on my to-do list. Ugh, the rules of the internet are weird…

Pin It