

Half Oval Pouch Set: Sneak Peek for Sizzix
Reply

 This week is finally the week, the Spinning Pyramid Quilt pattern I designed for Robert Kaufman is live and ready to download FOR FREE!
It is an Advanced foundation paper piecing pattern like my Spinning Icosahedron Quilt, but there are less sides to worry about. Plus there is the option to make 16 blocks like above, or 9 blocks or whatever combination you want!!
If any of you try the pattern out, please send me photos. I’d love to share them on here and on all the social media outlets.
 To jump start the holiday season and to celebrate all things handmade, the Silhouette Design team is having an awesome Blog Hop! We each made a project using our favorite Silhouette product and are also giving it away (all the information is at the bottom of the post). How awesome is that?!?
My favorite product is the Silhouette brand Sewable Fabric Interfacing. I use it in every fabric project I make for their blog, plus a load of personal projects for myself. It’s a great time saver that adds a special personal touch to your sewing projects. I use it to personalize quilted pieces or cut super intricate designs. It’s also great for kids clothes and any type of sewn gift.
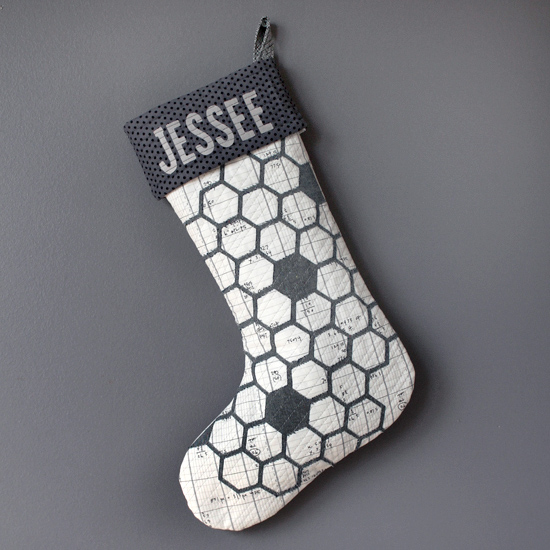
 I chose a personalized stocking as the project to showcase the Sewable Interfacing because it’s been on my to do list for YEARS! I started three, one for each of us, but was only able to finish the one shown due to my sewing machine malfunctioning. I’m hoping to share the other two, that my family helped design, later in the month.
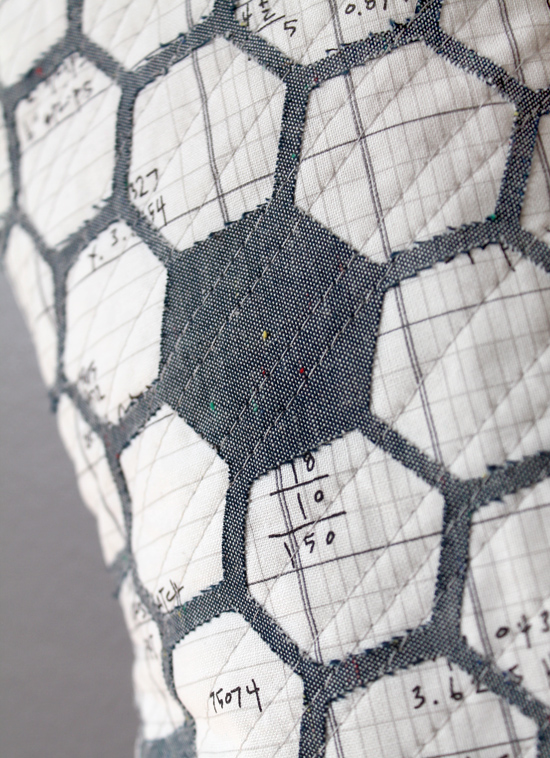
I wanted to show each of our very different personalities in a quilted sock form. Mine shows my love for shapes, polka dots, fabric with writing on it and the color gray. The Honeycomb Background design file would have taken forever to cut by hand, but with my Silhouette CAMEO it only took a few minutes.
 I also love how it looks super complicated, but was super easy to put together!
I used the Stocking design file and enlarged it as big I could to fit on the 12″x24″ cutting mat. I cut just the basic stocking shape out of card stock. I then opened the Honeycomb Background file and tilted it slightly so the edge near the toe made it look like a sock with those different colored toe tips. I clicked on “Release Compound Path” so all of the honeycomb lines were separated. I deleted a few hexagons here and there so some would be solid. I used some awesome rainbow speckled denim and I wanted to showcase it here and there.
Once I was happy with the file, I grouped it back together. I prepped and cut it as a I usually do (my full tutorial on the Silhouette blog can be found here) and ironed it onto my already cut out stocking. I also cut out a basic stocking piece for the back. I then spray basted both pieces to separate cotton batting and quilted them up like I would any quilt. I cut the lining out of the cute black and gray polka dotted fabric and sewed all of them together, just like you would a zipper pouch!
After everything was sewn and turned inside out, I folded down the top cuff and added my name using the Lovely Day Font (found in the Silhouette Design Store) and some solid gray fabric to finish it off.
It took me about two hours total to finish this one stocking. Not Bad, right?!!


Now onto the GIVEAWAY!
On Silhouette’s behalf, I will be giving away one pack of Silhouette Brand Sewable Interfacing and one Fabric Blade. To enter you NEED to follow Silhouette America and myself on Instagram. To earn additional entries you can follow me on Bloglovin and/or leave a comment letting me know what kind of projects you’d like to see on here in 2015!
Rules, Guidelines & Disclaimers:
This giveaway is being hosted by me, Jessee M / Art School Dropout, as part of the Silhouette Design Team Blog Hop. There will be only one winner chosen by Rafflecopter. This giveaway is open to US/Canada Residents, 18 & older. Void where prohibited. This giveaway is not associated with Facebook, Instagram, or Pinterest. Prizes will be fulfilled by Silhouette America. Winner cannot have won another Silhouette America giveaway in the past 90 days. Winners should expect their prize to arrive within 4-6 weeks. Only one entry per reader, period. Only the first comment posted will be counted. Giveaway starts at midnight December 1st, 2014 and will end at 11:59PM (EST) December 5th, 2014. Whew, I think that’s it!
Good Luck to everyone who enters. Please head on over to Guiseppa Gubler’s blog to find out what she’s giving away. Then from there hop on over to the next one and the next. If all works out you should finish up right back here where you started. If you’d like to start at the begging then go check out the Blog Hop Giveaway post on the Silhouette America Blog.
Updated:
Here’s a list of ALL of the Silhouette Design Team Blog Hop Posts in case you think you may have missed one!…
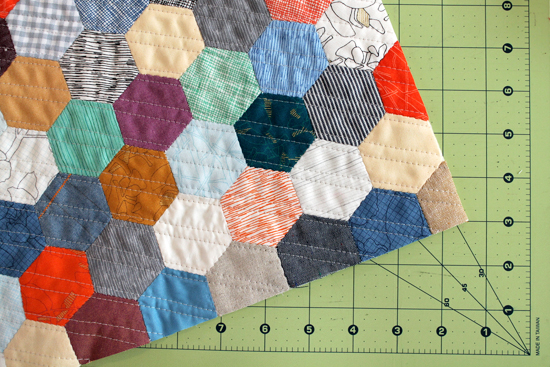
 I had mentioned a few weeks back that I was working on other hexie projects that were almost finished. Well, here’s one of them!! It’s a pillow made completely from mini charm packs, specifically the Carolyn Friedlander Favorite’s mini charm packs I was given when I visited the Robert Kaufman booths at Quilt Market. It’s a mix of Carolyn’s newest line Botanics and a bunch of different solids by Robert Kaufman.
 I was so excited to get a hold of these little things, and I seriously cut right into them the second I got home. Well, after I made custom paper hexagons specifically to fit these with little waste. I used my Silhouette Portrait to do that btw.
I documented the entire process on Instagram, so I’ll be sharing some of those photos too.
 Making the hexies themselves took no time at all. There were 120 2.5″ squares total (3 mini charm packs worth) and I can do about 35-40 a night. The part that took me the longest was whipstitching them all together. There wasn’t too much rhyme or reason to where I placed everything, I did make sure to keep similar pieces as far apart as I could, but thats it.
 I know some people stitch their hexies on the bottom and don’t go through the paper, but I found that doesnt work for me and my slightly uncoordinated hands. I work much cleaner and faster when i baste through the paper. You can see me taking out the basting stitches and papers above. I always use neon pink thread because it allows me to see every stitch so i don’t miss any before quilting.
 The above photo was just taken for fun! This was right after taking all of the paper out and steam pressing the entire thing. Isn’t it pretty?
 I seriously could not decide how I wanted this thing quilted. I’m really only good at straight lines and tracing around objects right now, so to make sure I secured all the hexies and still had a pretty design in the end I went with the above combination. I used the edge of the hexies and the edge of my basic walking foot to line up all of the lines. It went pretty fast this way and I absolutely love the texture it added.
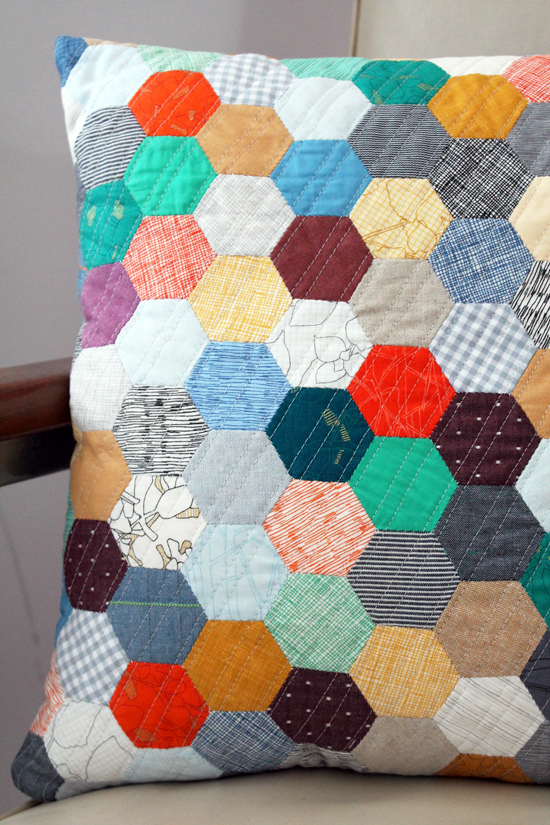
 I squared off the edges, quilted a simple back piece using Robert Kaufman’s Essex Yarn Dyed in Denim, added an invisible zipper and stitched the entire thing together…
 Tada, I have a finished pillow! One that has already been taken by my four year old as her own. She even gave me a hug and said thank you for making it for her. Ok, I guess it’s hers now.


 I’m waiting on an invisible zipper for my other hexie pillow I’ve been working on. This one actually IS for my daughters room. I’ll post photo’s of that project soon enough.
Who knows though, I might start working on a 5th and 6th hexie project too! I may be a little obsessed…
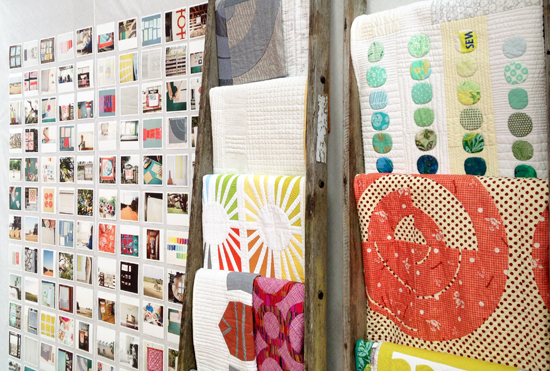
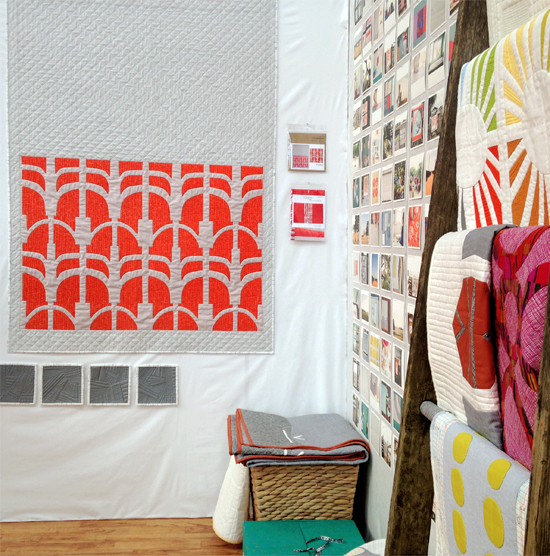
Pin ItI talked a bit about my experience and such at the 2014 Spring International Quilt Market yesterday. Today I want to share my absolute favorites. The lines that I know I will buy every piece from and make loads of pretty stuff with.
 To start I have to share everyone’s favorite, the first line from Cotton & Steel. They have a great story and are all very talented, so you should read up on them more to see what i’m talking about.


 Every single design from them is brilliant, and it all coordinates perfectly. So there loads of mixing and matching. It’s all very playful and vibrant and a few designs incorporate metallic colors which I’m loving right now.
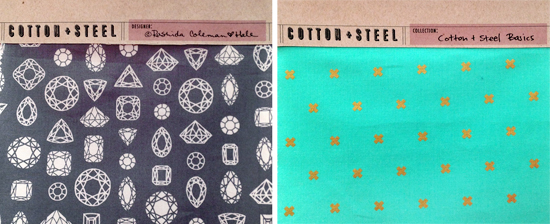 Though, I won’t lie, I’m most excited about their basics line. The dashes, cross hatches, lines and more are totally on my “must buy” list. I always prefer the basics, but they aren’t usually this perfect. I’ve already sketched out a quilt that would showcase these all perfectly.
 Next on my list of absolutely perfect was everything in Carolyn Friedlander’s booth. I was in love with her last line Architextures, and I’m even more in love with her newest line Botanics. I also had the pleasure of meeting her and chatting a bit. She’s even sweeter in person than she is online!
 I left her booth with a few mini charm packs that showcased her line, plus some of Robert Kaufmans basics. I’ve already cut into them all and can’t wait to share the piece I’m making, it’s just taking me a bit to finish.
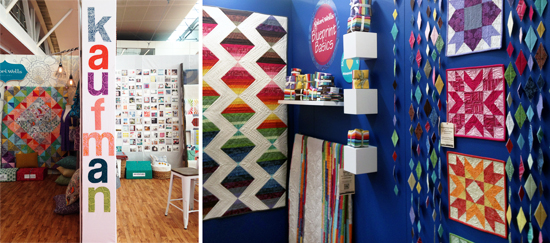 I also was a fan of everything else Robert Kaufman put their name on! Their Kona Cottons are a staples in all my projects, plus I picked up a bunch of polka dotted fabrics which will probably be used a lot soon. Check out that diamond fabric garland in the Blueprint Basics booth! I so badly want to recreate it.
 The last of my ultimate favorites was the awesome American Made Fabrics solids. They were gorgeous and person and I’m always a sucker for pretty solids. Plus look at those ottomans!!! I know a very cute little girl who would love one of those.
Ok, so that’s a wrap on the Quilt Market photos. I still have more to say about some of the things I brought home with me, but I promise this is the last photos from the actual event.
Like I said yesterday, I was inspired so much by just walking around this event. Then add all the conversations I had and I am set. It really made me 100%, fully realize, how much I love sewing, quilting and everything involved. It’s how Art School Dropout started actually, I was hand painting SEWN bags! I came home realizing that I want to be a part of this industry MORE, and I have sat here all week trying to figure out how to balance all my goals with all the stuff I’m already doing. I haven’t figured it out yet, and I’m not sure when I will, but I do know change is coming and it makes me really happy!