Back in September I participated in a few mini quilt swaps. You guys know how much I love those! They were all super strict and themed, and I loved making each and every piece. Sometimes guidelines are just what I need.
Pin It
Back in September I participated in a few mini quilt swaps. You guys know how much I love those! They were all super strict and themed, and I loved making each and every piece. Sometimes guidelines are just what I need.
Pin It
Today I am super excited to share a project from the newly released book Sew Adorkable: 15 DIY Projects to Keep You Out of Trouble by my friend Samarra Khaja. When she contacted me asking if I would like to review the book, my response was “I’m not great at reviewing things. I don’t hate enough. So how about I make something?” She went for it, and here we are!
To make this post even more awesome, there is a giveaway involved! You just have to read on a little more for all of the details.
Pin ItBefore I get carried away talking about how I made the below project, let me first announce the awesome news…
I am now a quilting contributor on the Sizzix blog!!! How awesome is that? This here is my first official post with them and I’m super excited to start sharing all of my projects on their blog and here on my own.
Ok, enough about all that, let’s talk about these trivets…

 It’s that time again. Time for me to talk a whole bunch about the current swap I’m part of!
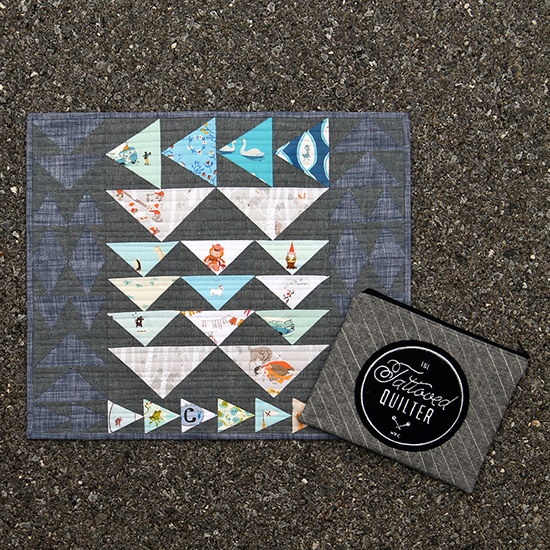
This last one was a Studio Ghibli themed craft swap. So it wasn’t just quilts, it was any type of craft. Well, almost any. The partner you are assigned does have a preference. I’m lucky mine likes mini quilts. If you are unfamiliar with anything Ghibli, then I recommend reading up on it a bit. Studio Ghibli is a Japanese animation film studio that has some of the best animated films out there (in my personal opinion, and apparently many others too). They created such films as Kiki’s Delivery Service, Princess Mononoke, Ponyo, Spirited Away, Castle in the Sky, etc etc. I 100% recommend you go and watch every single film they’ve made, if you havent already.
Anyway, for this swap I focused mainly on the film My Neighbor Totoro. My partner listed it as one they loved, and it fit best with their favorite fabrics and colors. Even though this should have been an easy make for me, I struggled. I couldn’t pin down just one idea. I had TOO MANY IDEAS! I put off working on the quilt until I made up my mind. In the meantime I made a little soot sprite brooch that you can read about a few posts back. So I wasn’t slacking completely.
I went out of town twice late Feb and early March, and then came home to the entire family being sick. So there was no time for any making for three whole weeks. Once everything got back to normal I went into panic mode and quickly picked out one of the designs I had come up with. It was a simple applique design of leaves around a hole that Totoro could peek out of.

To accomplish this look, I drew all the leaves by hand in a 5″ square. I then scanned in the doodle and enlarged it to 18″ square in illustrator. I also did a quick outline of Totoro and divided up all the pieces I’d need. I did this early in the morning before CT woke up, so instead of using my Silhouette CAMEO like usual, I decided to iron on the double sided fusible interfacing, print out templates, trace everything and cut out all the fabric by hand quietly. I miss doing that sometimes (not TOO often though).
The first part I pieced together was Totoro since that’s basically the bottom layer. I used a Corelle plate and traced a circle on the black and white fabric as my circle guide. I then did a reverse applique to get that perfect circle cut out (detailed instructions will have to wait until a later date) I made another circle 1/2″ bigger and attached my totoro applique to that. I then glue basted the two pieces together just so I could get a feel for the whole thing.
I pretty much just eyeballed the placement of the leaves, using my original sketch as a guide. I ironed them on in quadrants. Once they were all secured I attempted to hand embroider around all the edges. Lets just say it was the worst idea Ive had in a long time!! After a bunch of cussing and pulling out thread, I decided to do a machine blanket stitch around each piece using a dark mustard thread. Even though it was faster than by hand, it still took me a few hours to finish (broken up in two days of course).
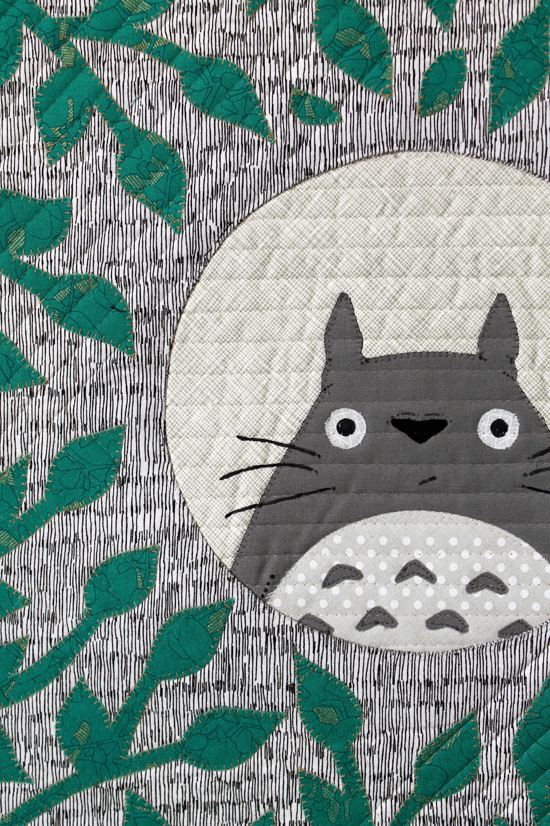 Once all of the applique work was finished, I quilted it up using invisible thread on the front and the same mustard thread on the back. I did 45 degree angled stitches on each corner, so it overlapped on the middle sides. I then did a simple straight line stitch in the circle and then around the applique to permanently secure it. Can I just say how much I’m loving invisible thread for these projects? In certain light you can hardly see any stitches at all!! It’s awesome.
To finish the piece off I bound it in some black chambray and hand painted the eyes, whiskers and mouth (using fabric safe paint of course).
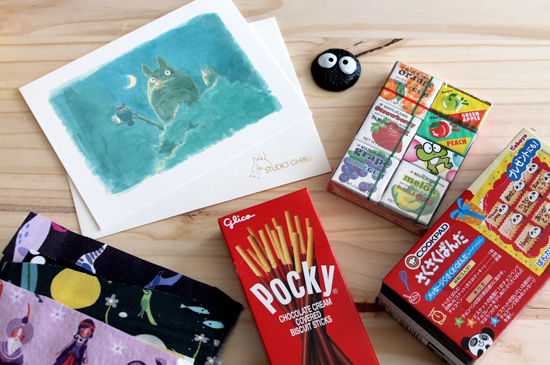 Since it was a swap, and all, I also added a few goodies in the package! A beautiful card I picked up at Disney World that would make a great framed print, the Soot Sprite brooch I made, some japanese sweets and a pile of Lizzy House fabric scraps (some from the new and yet to be released line).
I really loved working on this piece, and it really made me realize I LOVE making themed quilts. LOVE IT! If I sign up for anymore swaps (in addition to the other two im working on), they are going to be themed, period.
Whew, I think thats it! Everything was sent out two days ago, and it doesn’t look like my partner has received it yet. I’ll let you know what he/she thinks once they receive it. I also haven’t received my package yet, so expect another post talking all about that!!!!
Pin It
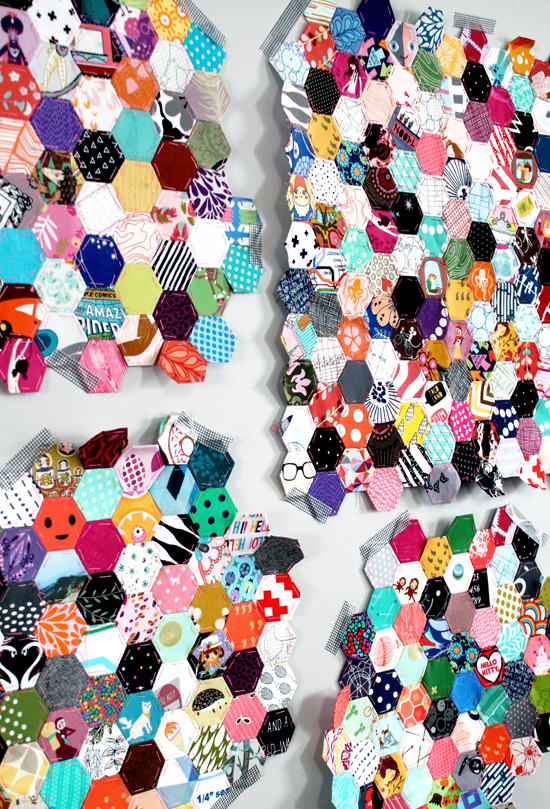
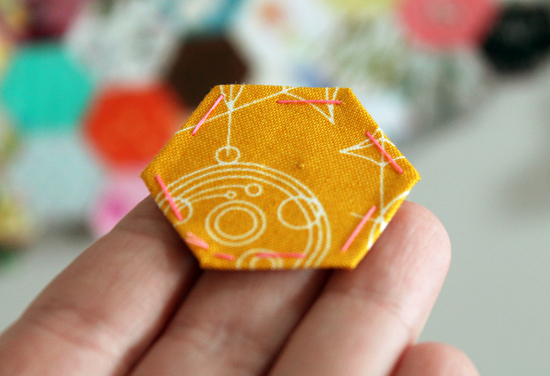 About 10 months ago I wrote a post talking about this new obsession I had with english paper pieced hexagons. I talked about making 1″ hexies and hand stitching them all together for a lap quilt.
Well, I’m only about 1/14th of the way there! This is turning into my forever project. That project that you just keep working on until the day you die. Seriously though, If I keep going at this speed, I wont be finished for at least 5 years. YEARS! I’m ok with that though. Since it’s mostly made from my own scraps, with a few donated by friends, I will be able to look back at each hexagon and think of the project I made or the friend that gave me the fabric. It’s basically my quilting scrapbook! Maybe I should rename it?!?


 I have been trying to keep this project under control by making 18″ blocks first and then piecing them all together in the end. As you can see above, I’ve finished one block and have three almost there. Each of the semi finished blocks is from a different level of the house or a different bag. I have project bags or boxes everywhere so I am never short of hexies to piece. That one on the bottom right for example, I pieced all of that in the airport this past weekend and a little on the plane. I did it in three sections to keep it manageable (and to not bring attention to myself) and then pieced the sections together at home.
This system really seems to be working for me.


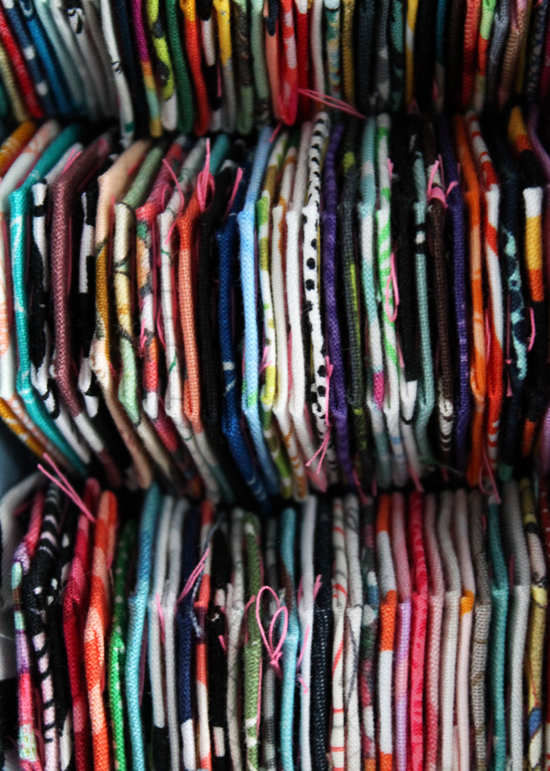
 Above you can see one of the storage systems I have been using. Nicole over at Modern Handcraft originally posted about these a few months back on InstaGram. They are Sterilite divided bins from Target and they can only be found in store. The little bins inside come out so you don’t have to have this huge bin on top of your table or wherever you are working. This seems to work best for me when I’m sitting on the couch actually. For any other situation I have little zipper pouches.
 I’m leaving for ANOTHER trip very soon and I’m thinking a pouch or two will be stashed away in my backpack, just in case I have free time, because I would love to finish this faster. It’s going to look so neat!!!!!
Keep an eye out in the next few months for yet another update on this thing (hopefully), and in the meantime I have some other Hexagon projects in the works that I’m also excited to share with everyone!
Pin It