“Design Your Own Pirate Flag” for Silhouette America

Design Your Own Pirate Flag for Silhouette America by Jessee M {an Art School Dropout's life}CT’s pirate themed 5th birthday party was a few months ago and I shared one of the crafts we did on the Silhouette America blog! Check the post out for a full tutorial on how I prepped everything!
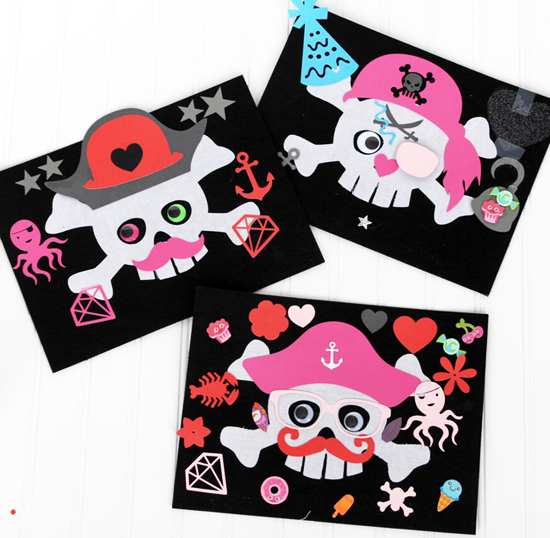
Design Your Own Pirate Flag for Silhouette America by Jessee M {an Art School Dropout's life}

It was a Design Your Own Pirate flag using felt, fabric and paper! It was a huge hit and all the kids made amazing flags!!

Pin It

Ash & Trey’s Baby Shower

ashtrey_babyshower_001Last weekend my husband and I hosted a baby shower in honor of my little sister Ashley and her husband Trey (who wanted a nickname like CT, so I’m going to be lazy and call him TN).

My mom did most of the work putting this whole thing together. From the food, to the candy bar, to the hot chocolate favors to the games and more. She went all out!!! The only thing I had a hand in was the little tags on everything, the food signs, the macarons and the photo booth and props. All but the last pieces were all her idea too! It was a lot of fun to help put together and I am so happy we were able to have it in our home! I also can’t wait to meet my newest niece sometime soon!! She’ll get a cute nickname unlike her dad, we’ll call her “Little R”.

Now be prepared for a bunch of photos, mostly up close, because that’s just my style!

ashtrey_babyshower_002ashtrey_babyshower_003ashtrey_babyshower_0045ashtrey_babyshower_004ashtrey_babyshower_006 ashtrey_babyshower_007(please note this awesome cake wrecks where Harris Teeter spelled my sisters name wrong and wrote “It’s a GIR!”)

ashtrey_babyshower_008ashtrey_babyshower_009ashtrey_babyshower_010ashtrey_babyshower_011Oh and the above picture is my other adorable little sister and her best friend!

My camera battery died halfway through the day and I had to borrow my sisters, so the photos are all weird and different. I also messed up on photos of the adorable banner I made and the gorgeous mobile/centerpiece my mom made using tissue paper, paper lanterns, tulle and other paper goods! It was so pretty we decided to hang it in CT’s playroom afterwards.

This was the first time my mom and I have collaborated on anything, it was a fun and surprising experience!

This was the third event we’ve had at our house in the last month, and the second to last. I’m super happy to have everyone over, but I won’t lie, it will be soo nice when I can get back to normal! I miss making a huge crafty mess!!!

Pin It

Birthday Macarons

CT really loves when I make macarons. She always steals a few off the counter before and after I fill them. So of course I would make some for her birthday party!

I tried something a little new with both of the batches.

On the bottom of the tray are strawberry macarons with strawberry preserve buttercream filling. These were a bit off in color and size since I used ground up freeze dried strawberries in the batter and I didn’t tint them like usual. Oh and the buttercream was just normal ole buttercream with two tablespoons of strawberry preserves blended in. Super easy! So even though they weren’t super pretty, they tasted great!!

The macarons on the top, and in all the close up photos, were peppermint flavored with peppermint buttercream filling. I tried my hand as swirly color, which came out nice on about half of them. I also made them slightly larger than I usually do, which I think made them even better!!

I also made a half batch of peanut butter macarons, but those didn’t make it to the party. They were just too good.

I feel a lot more confident every time I bake these awesome treats, so expect more posts about them. I have loads of flavor combos I still want to try. Any combos YOU think I should try?

(oh and all the photos above were taken by my sister Ashley, not me!)

Pin It

A Little More About CT’s Party…

As I said yesterday, I wanted to share a bit more about the decorating and goody bags from CT’s 3rd Birthday Party. I was very frazzled the day of, so all these photos were taken the day after! Just imagine cupcakes sitting on the white tray in the middle, some macarons on the two tiered tray and more “goody bags” in that white basket. Plus other odds and ends that were moved about.

It was a lot of fun to pick everything out, be it handmade, from a store or just from around the house. I didn’t go overboard, and I think it looked very cute and sweet. I really wish I had taken photos the day of!!!

I accidentally stumbled onto a color theme. It all started with those paper chains, I just picked out a multi pack of paper in what I thought were cute colors. After making them all (at night and in the car btw) I started to buy other things in the same colorways. All of the plastic silverware was in those colors, the last minute “Happy Birthday” banner matched (I meant to make one), even the flowers I found the night before matched! I sorta, kinda, accidentally made it all match! Ha. I love when things work out that way.

Oh and the wrapped picture frames! A lot of the guest liked those. I mainly did it because I felt the photos artwork underneath wasn’t really appropriate for a kid’s birthday party. It’s my Jordan Crane Triptych of a party with loads of booze on the ground, you can see it here. It’s fine for everyday viewing, just not a birthday.

I love the way it all looks, and I really don’t want to take it all down. Do I have to?

Ok, now onto the little chef hats…

These were a last minute idea! I mean, four days before the party last minute. I was flipping through the Fabric-by-Fabric One-Yard Wonders book to see if there were any xmas gifts I could make, when I came across the pattern for a kid’s adjustable chefs hat and apron. I read through the instructions and figured they wouldn’t be too hard to make, so I made a test one. The one above actually. It took me about 25 minutes from start to finish (I’ve been told I sew FAST, so it make take others longer). I figured 11 kids were coming, and that they would only take me an afternoon to make one for each. It kinda did. I ran out of some supplies halfway through and had to wait until I could go out and get them. Then I waited until the night before to attach the velcro, which wasn’t the best idea. But I’m glad I made them! All the kids looked soooo cute decorating their cupcakes while wearing chef hats!!

Now onto the goody bags, or in our case, balls! My original plan was to make the bags for the goody bags, but after seeing the over sized gumball machine capsules above, I changed my mind! How cool are they? We bought them in blue, green and purple. CT picked out a kazoo, mini view-master camera thingy, some chocolate and tattoos/stickers. I didn’t want to only have plastic trinkets in the balls though, so like an insane woman, I also made the crayon rolls! Another last minute idea. I felt crazy making them, so I didn’t even tell my husband what I was doing until I was halfway through. I didn’t want someone else thinking I was crazy too! They actually took less time then I thought they would and I was able to just use scrap fabric from my stash.

In the end it was all more work than I anticipated, but you know what? I felt great about the way the house looked and the things I sent home with each kid! Now they each have a chef hat for pretend play, and a crayon roll to take with them anywhere. Plus I made one of each for CT too. I wouldn’t change a thing, well, with the exception of having more sewing machine needles on hand.

I know there’s loads of tutorials online to make crayon rolls, I didn’t use any of them because of their sizes. Would anyone be interested in a tutorial to make these simple ones?

Pin It

CT’s 3rd Birthday!!

This past weekend was CT’s 3rd Birthday! Finally. I feel like I’ve been planning and making for this party for way too long. This is really the first year she’s aware of everything going on around her, so I wanted to make the day awesome!.

We invited a bunch of our friends and family, and ended up having ten kids show up total!! Only one couldn’t make it, not bad right? Especially for a winter birthday party, where you assume someone (or everyone) would be sick.

The theme for the party was CUPCAKES! Decorating cupcakes to be exact…

My original plan was to let the kids ice the cupcakes themselves and then decorate them with any of the numerous toppings we had. As the party grew closer I realized a lot of the kids that would be attending were younger than CT, so the icing part might just be a huge mess. So we iced the cupcake beforehand, that way all they had to worry about were the toppings.

I have been collecting sprinkles and cupcake liners for awhile, with no real purpose, until this party! I was able to provide 25 different types of toppings. There were colored sugars, candies in the shape of mickey and the aliens from Toy Story, dinosaur and snowflake sprinkles, long sprinkles, metallic sprinkles, two different types of cereal and more. I made sure to have every color of the rainbow, so each kid could use their favorite.

I also made a small batch of cotton candy buttercream in pink and blue, and small squeeze bottles with them. That way the older kids could draw on their cupcakes if they wanted.

It was really fun watching the kids all sit down nicely, put their chef hats on (I’ll talk about those in another post) and then go crazy decorating. A few of the younger ones couldn’t wait to decorate and just ate the cupcakes right away, but I made a bunch so they decorated their second one.

A lot of the adults were convinced our dining room would be a disaster afterwards. They were so wrong, most of the mess stayed on the table (which I covered in kraft paper) and hardly anything hit the ground. We had a very careful bunch of kids!! Seriously parents, your kids are all so nice!!

After all the decorating everyone was encouraged to eat from the buffet (that our families helped cook), let their little ones burn off some of the sugar they ingested, and then settle down before CT started opening gifts.

There are loads of great photos of her opening her gifts, she really makes the best faces!! I just figured 13 photos was already too many for one post, even if it IS a birthday post! Oh and while I’m kinda on the topic about photos, how awesome are these? My little sister Ashley took them for me, that way I didn’t miss anything. She also edited them before sending them over, super awesome of her! Thanks Ash!

The party went way better than I expected, and I’m beyond grateful for everyone who came. Thank you to you all, you really made CT’s birthday extra special!! Also thank you to all of our family members who helped out, I really couldn’t have made it through this day without you guys. It was all a lot of fun, and I wouldn’t change a thing. CT loved it all and keeps talking about it. We did all catch a cold, but it was totally worth it!

I still have a two more posts coming up about the decorating, goody bags and sweets, so keep an eye out!


Pin It

Jack-O’-Lantern Macarons

For this past weekends crafternoon, I thought it would be neat to make some halloween themed goodies. I was originally going to try a chocolate pumpkin pie recipe I saw online, but I didn’t have much time since our plane got in late on Friday and the party was Saturday. I can almost make macarons in my sleep, so I went ahead and made them instead.

I had the idea while we were away to add little faces to some of the macarons. I had always seen those Wilton Foodwriter markers while craft supply shopping, so I thought those might work. I made sure we stopped by AC Moore after we left the airport Friday, totally cutting it close! Ha!

They totally worked! I had to be very gentle, otherwise I’d have cracked the shell of the cookies. They don’t smudge, or run. It was actually a lot of fun making sure all the faces were different. Some were sad, some were happy, and one was crazy! I really love how they came out. I made a bunch for the party, a few for my neighbors (they were awesome and picked up all my UPS packages while we were gone) and a few for my family.

The orange ones are pumpkin spice flavored with chocolate buttercream as the filing, and the black ones are chocolate flavored with vanilla buttercream as the filling. All the colors came out exactly as I pictured, and so did the little faces. I really need to find other uses for these pens, their awesome!


Pin It