
 This is a new concept to me, but when Sizzix was looking for some design team members to do Christmas in July posts, I jumped on the opportunity.
My first thought was “Ha, this is the perfect excuse to finally make some holiday decor EARLY” since I always mean to, but never do. It took me awhile to narrow down a die to use, since there are just so many that aligned with my taste. After much thought, and help from Sizzix, I ended up with this awesome Snowflake die. More specifically the Sizzix Bigz Die – Snowflake.
I knew right away how I would use it too! I wanted a piece that was great for Christmas, but could also work for a month or two afterwards. That way I could be lazy and keep it out for awhile. Also, we don’t decorate for the holidays until after my daughters birthday which is the second week of December,so holiday decor that can stay up longer is a big bonus.
I took a few photos while I was putting this together, which means I have a quick tutorial so you too can make this awesome pillow!!

Supplies Needed:
- Sizzix Bigz Die – Snowflake
- Various Solid Blue Fabrics. Mine are all leftover Kona Cotton from my Icosahedron Quilt. Each Block should be no smaller than 5″
- Various Solid White and Light Grey Fabric. I used Kona Cotton here too
- the Warm Company’s Steam-A-Seam 2 Lite
- Batting (I used Warm & Natural Cotton Batting)
- Coordinating thread
- slightly coordinating thread
First thing I did was cut out out 9″ squares from both the white or grey fabric and the Steam-A-Seam. The Steam-A-Seam is sticker adhesive, so I just removed one of the protective layers and stuck the fabric down. I smoothed it out and pressed firmly to make sure it was adhered properly.
Then I cut the 9″ squares into four 4.5″ squares and set them aside.
Next I cut one to two 5″ squares from each of my blue fabrics, I had an uneven number of blues I really wanted to use, so that’s why there were single squares.
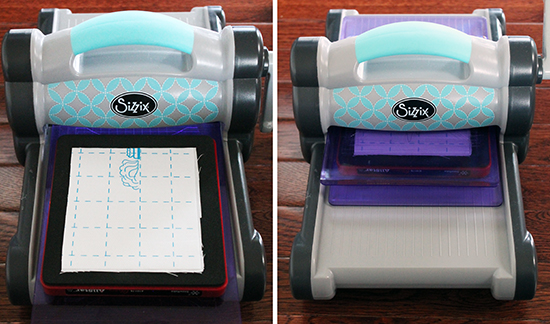
I took the pile of white and grey pieces to my Sizzix Fabi and ran them through. The proper way to do this is called the Sizzix sandwich. You start with a cutting pad, then the die with the foam side up, then whatever you are cutting (here I had the interfacing side up) and then another cutting pad. I cut two pieces at a time when using the Steam-A-Seam. This prevents shifting and pieces getting stuck.
 You can see here there isn’t much waste and the shape cut perfectly with the interfacing attached.
 Now were all ready to start assembling…
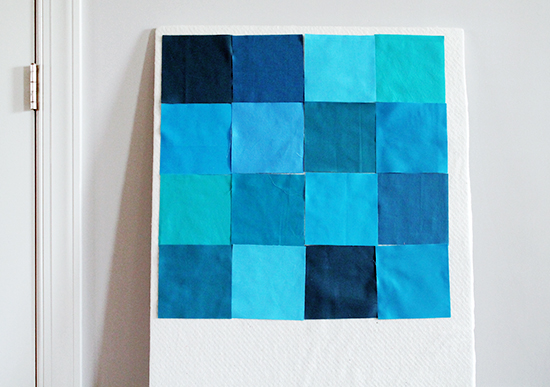 First thing I do is layout my pieces to see where I want them. This usually takes me about five minutes, because I’m constantly changing my mind.
As you can see above, I am using a portable design wall I made out of leftover Homasote wrapped in extra batting that I stapled to the back. It’s great for this step because I can just carry the board over to my machine and pull off the pieces that need to be sewn in a specific order. The Homasote hardly weighs a thing. It’s awesome.
Ok, back to this tutorial…
After I was happy with the layout I stitched all of the blocks together using a 1/4″ seam allowance. Once they are all together, you ended up with a 20.5″ square piece.
 Now were are ready to adhere some snowflakes!
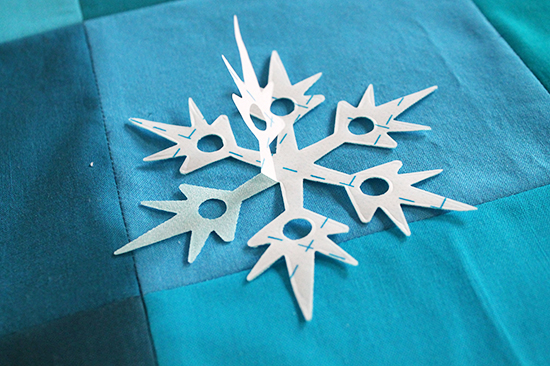
 This Steam-A-Seam2 is amazing because you hardly have to use an iron! I was able to sit on my couch for this step. All you do is peel off the other side of the protective layer and position it in the middle of a block and press firmly. How easy is that?!? Best part is, if you don’t like the way it looks, you can peel off the piece and re stick it somewhere else. It isn’t permanent until you use a dry iron and slowly iron over each piece. I love this stuff!
Once, you have all of the snowflakes permanently adhered you are ready to quilt the top. You have two options here. The first is you can top stitch around each snowflake so a look similar to these trivets I made, or you could use a method called matchstick quilting. I chose the second option.
Matchstick quilting is when you stitch a whole bunch of lines, sometimes in various colors, super close together. It isn’t recommended for all quilts as it makes them a little stiff, but for projects like this, it’s perfect. All those close lines help keep all these thin snowflake pieces in place!! I used a few different color threads to achieve a bit more depth.
 It’s not too noticeable, but I used white, light gray and light blue thread. I started out in the middle with light gray thread and used one of the seam lines as a guide. I stitched 1/4″ away all the way across. Then the next line was 1/2″, then the next was 3/4″, and then 1/2″ again and so on and so on. I did this from the middle out, on both sides. Staggering the distance between the lines. I wasn’t super careful either, so some lines were a bit wonky. Afterwards I threaded my machine with the light blue thread and filled in some of the spots between the light gray lines. Lastly I went through with white thread and just did a few lines here and there. Especially where the snowflake tips needed to be tacked down.
 To finish the pillow off I used some quilted dark gray Kona for the back, and a 20″ invisible zipper sewn into the bottom.
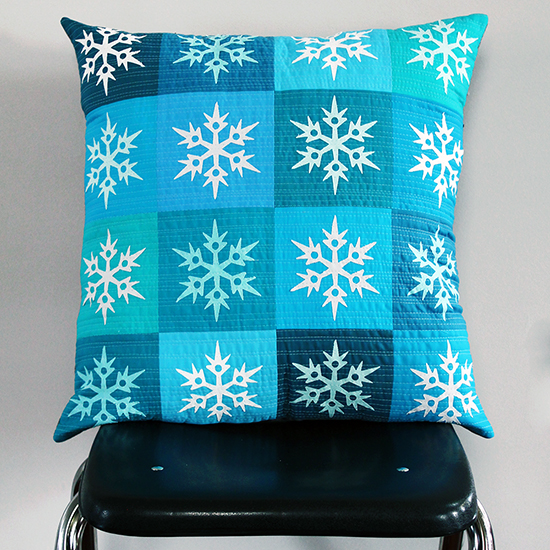
This was a very rewarding project because I am absolutely in love with the finished piece. It was so easy to put together and the end result looks like it was difficult. Those are always the best!
Oh, and you want to know the best part? This project totally kick started my need to make holiday decor!!! I already have a few other pillows in the works, along with a tree skirt. A TREE SKIRT! I’m hoping the flame doesn’t sizzle, and I actually finish them before December. I guess if I don’t I’ll have things to share NEXT July…
Pin It
Pingback: 7 Merry Must-Makes for the Holidays