A Drunkards Path Pillow: AKA My First Time Piecing Curved Seams

A Drunkards Path Pillow: AKA My First Time Piecing Curved Seams {an Art School dropout's life}A friend of mine celebrated her birthday a couple months ago and I really wanted to make her something neat. I wanted it to be a bit Halloween and a bit everyday casual. I had just bought the smaller Accuquilt Drunkards Path Die and I was itching to try it. I had never pieced a curved seam, so I had no idea if it would actually come out or not.

A Drunkards Path Pillow: AKA My First Time Piecing Curved Seams {an Art School dropout's life} A Drunkards Path Pillow: AKA My First Time Piecing Curved Seams {an Art School dropout's life} A Drunkards Path Pillow: AKA My First Time Piecing Curved Seams {an Art School dropout's life}
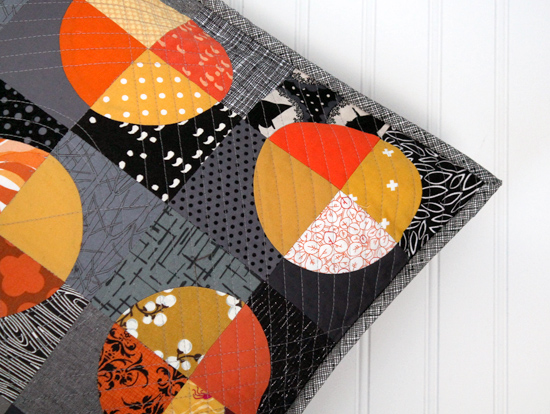
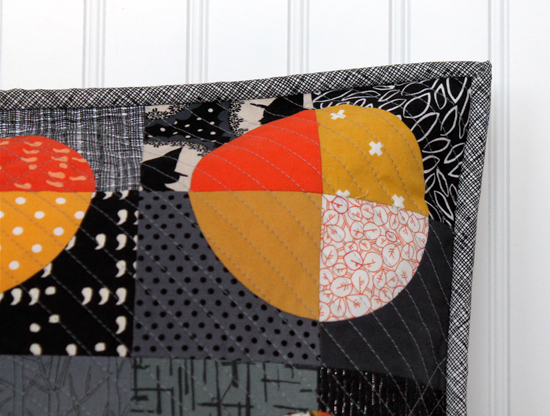
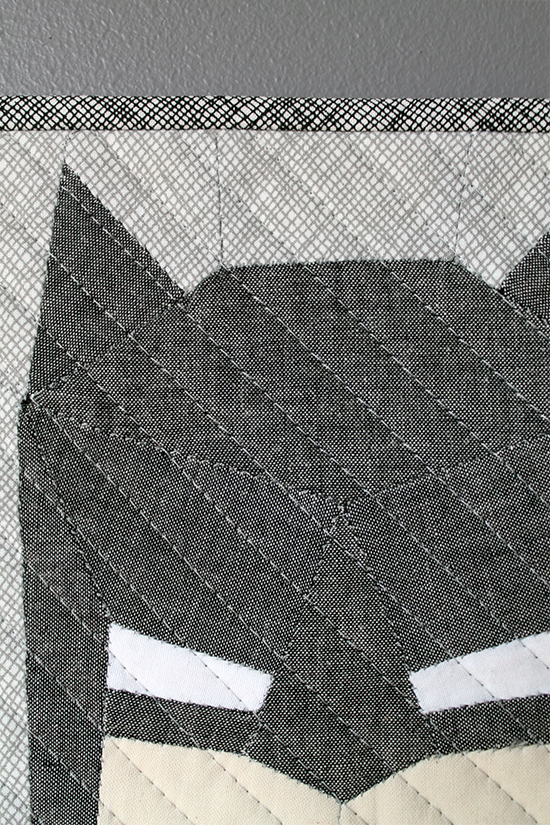
Well, as you can see, it came out beautifully! So much so, I have been obsessed with sewing curves ever since. (Check back tomorrow and I’ll show you another curved piecing project).

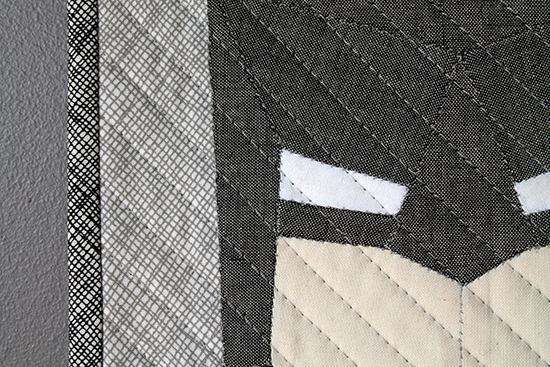
The top is all fabric I had on hand. I love just picking from my Stash for projects like this. It gives it a more homey, scrappy feel. Also, as you can see, I have a thing for buying black and gray fabric, so it was neat seeing them all next to each other.

I quilted the top in the way I normally do, in a 45 degree angle. However this time I only did the corners and let the lines overlap. So there’s lines and squares. To stabilize the middle I also quilted around the middle circle and stitched in the ditch of the middle seams.

A Drunkards Path Pillow: AKA My First Time Piecing Curved Seams {an Art School dropout's life}

The back is Essex Yarn Dyed Linen in Black and is quilted with quick wavy lines. I added a (mostly) invisible zipper as the closure. I’m still getting the hang of zippers.

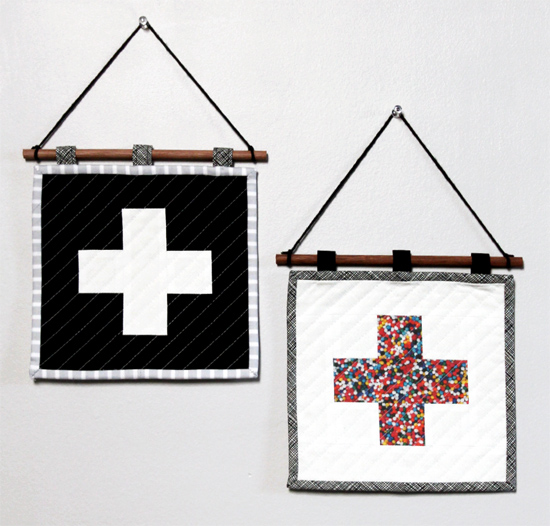
I also stepped outside my comfort zone and bound the edges instead of having inside seams. I think this may be one of my new favorite ways to finish a pillow! Also, its great for gifts because the recipient can take out the pillow form and just be left with a mini quilt to hang on the wall or something.

A Drunkards Path Pillow: AKA My First Time Piecing Curved Seams {an Art School dropout's life}

Now here’s where I will sound like the biggest jerk. I was planning on giving it to my friend in person soon after her birthday, but then I got super sick (pneumonia) and have been playing catch up since. She should be receiving the pillow in the mail TOMORROW! (oooh, now my friends reading this have to figure out which of them is receiving this pillow!! hahaha. I have a few gifts that just got mailed out, so really it could be any one of you.) I really hope she likes it.

A Drunkards Path Pillow: AKA My First Time Piecing Curved Seams {an Art School dropout's life}

I seriously can not wait until after the holidays, when I have more free time to mess around with this die. There are so many possibilities for these little quarter circles, and I feel like I’m just getting started.

Pin It

A Round Quilted Table Topper For Silhouette America

A Round Quilted Table Topper For Silhouette AmericaTwo weeks ago I did a half tutorial over on the Silhouette America blog showcasing the above table topper! It was super easy to put together and looks awesome with my Pyrex bowls.

So if you’re looking for a quick gift or decoration, then go check out the post,! (Theres way more photos too!)

Also, if you are already a Silhouette user, then make sure to check out the Silhouette Design Team Blog Hop Giveaways! Theres just one more day left to enter.

Pin It

My Hexagon Stocking Project For Silhouette America PLUS a Blog Hop Giveaway!

My Hexagon Stocking Project for Silhouette America {an Art School Dropout's life}To jump start the holiday season and to celebrate all things handmade, the Silhouette Design team is having an awesome Blog Hop! We each made a project using our favorite Silhouette product and are also giving it away (all the information is at the bottom of the post). How awesome is that?!?

My favorite product is the Silhouette brand Sewable Fabric Interfacing. I use it in every fabric project I make for their blog, plus a load of personal projects for myself. It’s a great time saver that adds a special personal touch to your sewing projects. I use it to personalize quilted pieces or cut super intricate designs. It’s also great for kids clothes and any type of sewn gift.

My Hexagon Stocking Project for Silhouette America {an Art School Dropout's life} My Hexagon Stocking Project for Silhouette America {an Art School Dropout's life}I chose a personalized stocking as the project to showcase the Sewable Interfacing because it’s been on my to do list for YEARS! I started three, one for each of us, but was only able to finish the one shown due to my sewing machine malfunctioning. I’m hoping to share the other two, that my family helped design, later in the month.

I wanted to show each of our very different personalities in a quilted sock form. Mine shows my love for shapes, polka dots, fabric with writing on it and the color gray. The Honeycomb Background design file would have taken forever to cut by hand, but with my Silhouette CAMEO it only took a few minutes.

My Hexagon Stocking Project for Silhouette America {an Art School Dropout's life}I also love how it looks super complicated, but was super easy to put together!

I used the Stocking design file and enlarged it as big I could to fit on the 12″x24″ cutting mat. I cut just the basic stocking shape out of card stock. I then opened the Honeycomb Background file and tilted it slightly so the edge near the toe made it look like a sock with those different colored toe tips. I clicked on “Release Compound Path” so all of the honeycomb lines were separated. I deleted a few hexagons here and there so some would be solid. I used some awesome rainbow speckled denim and I wanted to showcase it here and there.

Once I was happy with the file, I grouped it back together. I prepped and cut it as a I usually do (my full tutorial on the Silhouette blog can be found here) and ironed it onto my already cut out stocking. I also cut out a basic stocking piece for the back. I then spray basted both pieces to separate cotton batting and quilted them up like I would any quilt. I cut the lining out of the cute black and gray polka dotted fabric and sewed all of them together, just like you would a zipper pouch!

After everything was sewn and turned inside out, I folded down the top cuff and added my name using the Lovely Day Font (found in the Silhouette Design Store) and some solid gray fabric to finish it off.

It took me about two hours total to finish this one stocking. Not Bad, right?!!

My Hexagon Stocking Project for Silhouette America {an Art School Dropout's life}My Hexagon Stocking Project for Silhouette America {an Art School Dropout's life}

Now onto the GIVEAWAY!

On Silhouette’s behalf, I will be giving away one pack of Silhouette Brand Sewable Interfacing and one Fabric Blade. To enter you NEED to follow Silhouette America and myself on Instagram. To earn additional entries you can follow me on Bloglovin and/or leave a comment letting me know what kind of projects you’d like to see on here in 2015!

Rules, Guidelines & Disclaimers:

This giveaway is being hosted by me, Jessee M / Art School Dropout, as part of the Silhouette Design Team Blog Hop. There will be only one winner chosen by Rafflecopter. This giveaway is open to US/Canada Residents, 18 & older.  Void where prohibited. This giveaway is not associated with Facebook, Instagram, or Pinterest. Prizes will be fulfilled by Silhouette America. Winner cannot have won another Silhouette America giveaway in the past 90 days. Winners should expect their prize to arrive within 4-6 weeks. Only one entry per reader, period. Only the first comment posted will be counted. Giveaway starts at midnight December 1st, 2014 and will end at 11:59PM (EST) December 5th, 2014. Whew, I think that’s it!

a Rafflecopter giveaway

Good Luck to everyone who enters. Please head on over to Guiseppa Gubler’s blog to find out what she’s giving away. Then from there hop on over to the next one and the next. If all works out you should finish up right back here where you started. If you’d like to start at the begging then go check out the Blog Hop Giveaway post on the Silhouette America Blog.

Updated:

Here’s a list of ALL of the Silhouette Design Team Blog Hop Posts in case you think you may have missed one!…

******************************************
Pin It

My EPP Batman Mini Quilt

My friends over at Crafty Geeks celebrated their Instagram followers this month by organizing an english paper piecing (EPP) contest! They sent out a Batman and a Wolverine pattern to all of their interested followers and gave us a month to put something together.

Crafty Geeks Paper Pieced Batman {an Art School Dropout's life}Of course I fell behind (I took on too much this past month) and was only able to make Batman. I used some of my favorite fabrics for a very neutral looking piece.

He measures 8″ square and is quilted with a simple 45 degree angled straight line. I hand sewed the binding on while watching Constantine, so it’s a bit wonky because I was so interested in the show! ( At least I was was watching a DC show while sewing a DC character, right?). It’s the perfect size for our pop culture gallery wall, and even though he’s not the correct colors, my husband approves!

I absolutely loved how nicely the Crafty Geeks pattern went together, and will totally be sewing more soon. Most likely after the crazy holiday season is over! I 100% recommend that all my nerdy sewing friends out there check out their shop!

Crafty Geeks Paper Pieced Batman {an Art School Dropout's life} Crafty Geeks Paper Pieced Batman {an Art School Dropout's life} Crafty Geeks Paper Pieced Batman {an Art School Dropout's life} Crafty Geeks Paper Pieced Batman {an Art School Dropout's life}


Pin It

Shop Update: Three Baby Quilts

muted_hexagon_quilt_mintgraytan_006_550I’ve been making baby quilts lately as a form of therapy and as skill building exercises. The size is perfect because one yard of fabric fits on the back and I can sandwich everything together on my work table. However my little one is starting to outgrow this size and I really have no use for a stack of baby quilts. Soooo I added them to the shop!

I priced them according to quilts similar in quality and design that I’ve seen online. I don’t plan on taking custom requests and won’t update quilts non stop, but it’s nice to know that if I have an idea I can test it out and it may end up finding a new home one day, not just sit on my shelf and get dusty.

$195.00  Hexagon Baby Quilt - Mint, Gray, Tan & White {an Art School dropout's life}The first three quilts that I added are all completely different. Both in color and design. There is the light muted tone hexagon quilt above

$200.00  Rows of Plus Signs Quilt - Black, White & Mustard {an Art School Dropout's life}$200.00  Rows of Plus Signs Quilt - Black, White & Mustard {an Art School Dropout's life}

The black in white plus sign quilt with a surprise mustard colored backing

$175.00  Icosahedron Baby Quilt - Blues & Grays {an Art School Dropout's life} $175.00  Icosahedron Baby Quilt - Blues & Grays {an Art School Dropout's life}And the icosahedron quilt made up of lots of blues and grays.

I’d love to hear your thoughts about these pieces and anything else that may be on your mind right now!!

Pin It

Mini Plus Sign Hanging Quilts

Mini Plus Sign Hanging Quilts {an Art School Dropout's life}

Earlier this week I hit 3,000 followers on Instagram. As a thank you to all of the inspiring, creative, ambitious and supportive people I have met through this social networking portal, I set up a giveaway. I made the above two mini quilts specifically to say thank you. I made one Black, White and Gray for all my followers who I know love the basics, and then I made a rainbow sprinkle one for all those followers who are colorful and bubbly.

They are each 7″ square and hung from a walnut dowel that has not been stained, but was just left its natural color. I loved making these, because I finished them in a day which gave me a feeling of accomplishment. I’m all for projects like that!

Mini Plus Sign Hanging Quilts {an Art School Dropout's life} Mini Plus Sign Hanging Quilts {an Art School Dropout's life}I know I will probably get asked where the sprinkle fabric is from, and I’m sorry to say it can’t be purchased. I made it for my own personal use from a photo I took of an entire bottles worth of sprinkles. I get it printed on a fat quarter and just cut small pieces from it, and I have no idea how to make it into a repeat pattern. If anyone else is interested in just fat quarters too, let me know and I’ll set up a listing on Spoonflower.

Oh and while I have your attention, I would like to thank you too!! Thank you for reading my little blog and encouraging me to continue!!


Pin It